This environment, based on some management conventions and comprising several utilities, is an attempt to formalize software production and especially configuration management around a package -oriented principle.
The notion of packages represents hereafter a set of software components (that may be applications, libraries, documents, tools etc...) that are to be used for producing a system or a framework . In such an environment, several persons are assumed to participate in the development and the components themselves are either independent or related to each other.
The environment provides conventions (for naming packages, files, directories and for addressing them) and tools for automating as much as possible the implementation of these conventions. It permits the description of the configuration requirements and automatically deduce from the description the effective set of configuration parameters needed to operate the packages (typically for building them or using them).
CMT lays upon some organisational or managerial principles or mechanisms described below. However, it permits in many respects the users or the managers to control , specialize and customize these mechanisms, through parameterization, strategy control and generic specifications.
Many such packages are produced and maintained.
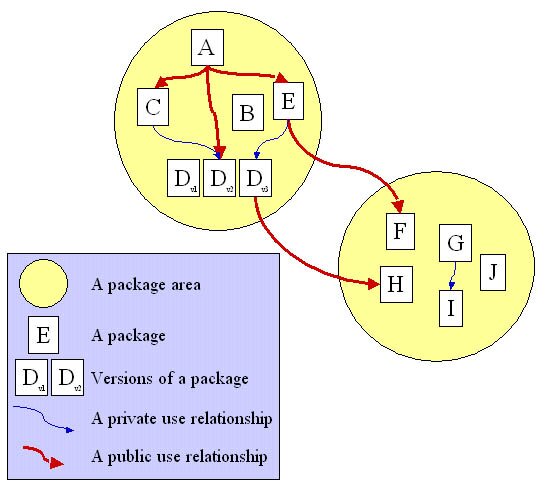
Packages sets may be structured in areas implementing a project oriented organization.
The projects represent independent organisations of packages, but may be interconnected as a direct acyclic graph of projects
The packages may or not be related with each other (defining also a direct acyclic graph of packages - not just a single tree).
The concept of package may be extended to implement structuring or organizing patterns such as those involved in project management.
Project management policies and behavioural patterns can be easily expressed and automated by CMT.
Each executable application (from now on simply named applications ) either belongs to a particular package and/or defines its own environment and then makes use of some other packages.
Each package can be uniquely identified within the system or the framework by a name which is usually a short mnemonic and which may be also used for isolating its name-space (eg. by prefixing components of the package by its mnemonic).
A package installed in this environment may be exported to a site where the architecture is reproduced, and as long as the local organisation defined for the package is preserved through the transport, the reconstruction procedure will be preserved. Configuration specifications can be easily provided to cope with machine, site or system specific features.
Packages are maintained consistently to their declared relationships to each other through a version identification model based on :
a version is defined with a mnemonic comprising one to three numbers the major id, the minor id, and the patch id
versions with different major ids are said to be incompatible,
versions with same major ids but different minor ids are said to be backward compatible with respect of the minor id ordering.
versions differing only by their patch id are said to be fully compatible with each other.
Projects are also referenced using a release
Version control and management schemes (eg. by using CVS ) are usually consistently operated, applying the conventions on organization and version identification.
An application that uses one or several packages managed in this environment should not itself be constrained to be managed by CMT . The tools should only require a few exported features (such as a few environment variables) for referencing any given package.
Similarly, a package maintained in this environment must be able to use packages that are not managed in this environment (which are often called external packages).
Following these definitions, the basic configuration management operations involved here (and serviced by the CMT tools) consist of :
installing the packages in conventional locations so that they can be referenced by each other, following projects or teams structuring paradigms,
describing the configuration ?requirements? for each package:
dependencies to other packages,
generic behavioural patterns meant to describe generic configuration items or project specific policies.
symbols to be exported to client packages (environment variables, make macros, etc...)
components (also named constituents ) of the packages (libraries, applications, generated documents)
parameterization of the build and test tools
parameterization of the deployment tools
strategies that CMT should follow at run time, overriding its default ones.
deducing the effective configuration parameters from the ?requirements? so as to automatize the building phases and the run-time operations and connections between packages (typically for generating makefiles, generating compiler and linker options, shared libraries paths etc...). This construction mechanism follows customizable strategies (eg. for selecting among possible alternate versions of available packages).
This environment relies on a set of conventions, mainly for organizing the directories where projects and packages are maintained and developed :
Each package is installed in a standard directory structure defined at least as follows:
///cmt
or (obsolescent convention )
///mgr
The directory level may also be omitted, in which case the version information will be stored inside the cmt directory in a conventional file named version.cmt leading to the following alternate organization:
//cmt/version.cmt
In both cases, the cmt directory holds the main source of information needed by CMT : the requirements file. All CMT -related operations are generally executed from this directory.
This style of organization should be considered as the basic (and unique) criterion for a package to be recognized as a valid CMT package . Any other structuring convention will be supported by CMT and its operations can always be customized to follow them
This structure is a central concept since all relationships between packages relies on the package identification which unambiguously and exclusively consists in the duet [ package-name , package-version ] (or package-name only when the version directory level is omitted).
Constructing the internal structure of a package.
Many other parallel directory branches (similar to cmt ) such as src , include or test may be freely added to this list according to the specific needs of each package. In particular, a set of such parallel branches are expected to contain binary outputs (those that compilers, linkers, archive managers or other kinds of code or pseudo-code generators can produce). Their name always corresponds to the particular configuration tag used to produce the output (such as the machine or operating system type). The CMT toolkit provides, through the cmt system utility, a default value for this token. An environment variable (CMTCONFIG ) is also assigned to this value (See the complete description of configuration tags).
Each branch may in addition be freely structured, and there is no constraint to the complexity of this organization.
1 - Structuring a package - A typical example.
Organizing a software base.
A software base is generally composed of multiple coherent sets of packages, each installed in its specific root directory and forming different package areas or sub-projects
Package areas implement the concept of projects or sub-projects which correspond to the practical organization of the software base.
There are no constraints on the number of such sub-projects or areas into which CMT packages are installed. We'll see later how the different sub-projects can be declared and identified by CMT .
This environment is based on the fact that one of its packages (named CMT ) provides the basic management tools. CMT , as a package, has very little specificities and as such itself obeys the general conventions.
Then the complete software base is organized in terms of projects (or sub-projects ), containing consistently managed package sets. Projects are localized either globally or individually:
globally using the environment variable CMTPROJECTPATH that describes all locations where CMT projects can be found
individually using the environment variable CMTPATH that describe all package areas where packages can be found
Packages are localized respectively to the projects they belong to.
It should be noted that the choice of a location for installing CMT itself is totally independent of the locations where projects are installed and managed.
CMT is operated through one main user interface : the cmt command, which operates the CMT conventions and which provides a set of services for :
creating a new package. This operation will create or check the local package directory tree and generate several minimal scripts (see the description of the create command),
describing or monitoring :
the relationships between the package and other packages
the configuration features either specified in the current package, or imported from related (used ) ones. (symbols, patterns, fragments)
the constituents of the package in terms of libraries, executables, or generated documents.
automatically generating the reconstruction scripts (makefiles ) from this description.
recursively acting upon the hierarchy of used packages.
Several other utilities are also provided for some specific activities (such as the automatic production of shared libraries, C prototypes, management of interactions between CVS and CMT itself, the management of a similar architecture for Windows or OS9 , setting up protections for packages (through locks) etc...).
CMT has been ported and tested on a wide range of machines/operating systems, including :
DEC-Unix V4.0
HP-UX-10 (several types of platforms)
AIX-4
Solaris
IRIX
Several variants of LynxOS
All variants of Linux (RedHat, Debian, SuSe, ScientificLinux, ...)
Windows 95/98/NT/Windows2000 in various environments:
CYGWIN_NT-5.1 environment
nmake based environment
MSDev/VisualC 6 environment
MSDev/VisualC 7 environment
Darwin (Mac OS X)
This in particular means that a package developped on one platform may be re-configured towards any of these platforms without any change to its configuration description. All platform specific tools will be dynamically reconfigured and parameterized transparently.
In the CMT terminology, the complete software base is composed of CMT packages. Those packages are organized into sub-projects. The semantics of a sub-project is very opened since it's merely an area for grouping CMT packages. Typically sub-projects may correspond to
a structuration in software domains, such as Reconstruction, Simulation, Graphics, Core, etc.
how responsibilities or management policies are defined and assigned
reusing or sharing different software products from different projects
Considering the simple structuring aspects of sub-projects, two important configuration parameters (environment variables) handled by CMT must be understood before attempting to manage packages:
CMTPROJECTPATH for a global specification of where projects can be found. This specification should be considered as the standard mechanism for structuring the software base since from it, CMT can and will deduce all other localization parameters (like CMTPATH ).
CMTPATH offers a more internal mechanism for localizing packages. It's not generally meant to be defined manually since CMT will construct it from CMTPROJECTPATH . However, it's important to understand how this configuration parameter is used to locate packages.
Projects receive detailed descriptions or specifications in a dedicated project file , always located in a cmt directory at their top directory level, and named cmt/project.cmt . It can receive the following specifications:
The project name specified here takes precedence over the project name specified in the directory structure. However when CMTPROJECTPATH is not specified, this may cause conflicts in the localization of projects. In this case it's highly recommended to always use the same naming convention in project files as in the directory hierarchy.
Projects are hierarchized as a directed acyclic graph. The minimal hierarchy simply corresponds to the order of the CMTPATH items. A more complex hierarchy can be specified through use statements between sub-projects. This hierarchy also defines a parent/child relationship between projects. If a project A uses another project B , A is also named the parent and B the child
CMT Strategies (for build or setup) are separately collected into each project. Therefore one can apply different strategies to different sub-projects. The strategy specifications may appear in requirements file of any package of a project or in the cmt/project.cmt project file.
By default a project inherits the strategies of its parents. Or if it's the top project, it follows the default strategies defined by CMT (Refer to this appendix to see the default strategies currently defined by CMT).
This will create the complete directory hierarchy from the current directory (or, when it is specified from the optional project path). It will also create a project file containing the project name, and optionnally will initialize it with some use statements.
Note that the argument may be left empty (or to an empty string). In this case, the directory hierarchy will be limited to the single level of the project name.
Then, when standing in the WorkArea the following projects will appear displayed from bottom to top as
> cd /test/WorkArea
> cmt show projects
WorkArea (in /test/WorkArea) (current)
  ProjectA 1.0 (in /test/ProjectA/1.0)
    ProjectB 1.0 (in /test/ProjectB/1.0)
Of course the preferred way to characterize this software base should rather be based on specifying the relationships between those three sub-projects, through the use statements in the projects files.
For instance in our little example, we could add the following statement into the project file of WorkArea:
use ProjectA 1.0
and the following statement into the project file of ProjectB:
use ProjectB 1.0
Then instead of specifying CMTPATH we'd rather simply define CMTPROJECTPATH as:
/test
This complete sequence may also be shortened as follows:
Few behaviours of the configuration management process can be tailored with respect to CMT, via means of defining strategies . Then according to these strategies, CMT will behave in well defined ways.
Every strategy setting is a boolean value, instructing CMT to activate or not a given behaviour. As such it defines two mutually exclusive CMT tags and it activates one of them.
In the context of a hierarchy - a graph - of projects, strategies are transmitted along the graph, according to the use relationships specified between the projects. A project transmits its strategies to its clients except when one of them overrides those strategies.
Several mechanisms help defining project specific properties, and more specifically making use of the strategies:
The parameter is expanded in the cmtpath_pattern construct in addition to the parameter. This parameter is assigned the name of the project associated with the running CMTPATH entry.
The parameter is also available for normal patterns. In this case it is assigned the project name associated with the cmtpath parameter for the current package.
Every project defines a tag of the same name, and the tag of the current project is active.
The cmt_installarea_prefix macro is specialized per project and every project may override the _installarea_prefix macro. The default value of any _installarea_prefix is ${cmt_installarea_prefix} (which itself is a global macro that receives a default value from CMT )
This is an environment variable containing a search list, very similar to the well know Unix or Windows PATH environment variable. It specifies a list of file paths where CMT projects can be found. The syntax of this search list follows the standard syntax of search lists, i.e. items are separated using a : character on Unix and a ; character on Windows.
One should understand this search list as the primary mechanism to locate sub-projects in the software base, and therefore packages. This in particular can completely replace the CMTPATH -based search mechanism for packages that was used before v1r18 . However the two mechanisms are still both supported and in fact interact with each other.
A sub-project in itself is a multi-level directory structure, located below one of the items of this search list, and composed of:
the sub-project name
the sub-project release (which may span several directory levels)
there are two project areas, one for the main developments (/project-area1 ), and another one for managing external products (/project-area1 )
project-area1 offers three sub-projects Reconstruction , Simulation and Core
project-area2 offers two sub-projects ProductA and ProductB
the sub-project Reconstruction is available in two releases 1.0 and 2.0
the sub-project Reconstruction offers two packages RecA and RecB
the sub-project ProductB is available in two releases v1r8p3 and v1r10
This search list is used to interpret the use statements written in the project files. This project use statement takes the form:
project-use
:
use project-nameproject-release
Typically, in our example one could construct the project file of the Reconstruction sub-project as follows:
use Core 1.0
use ProductA 1.1.2
Note that sub-project release identifiers are always considered using a perfect-match principle.
Structuring the set of sub-projects comprising a software base is sufficient to permit CMT to find all sub-projects and thus all packages in them. Defining CMTPROJECTPATHand installing the list of use statements in all appropriate project files entirely suppress the need of manually defining the CMTPATH search list.
This is an environment variable containing a search list, very similar to the well know PATH environment variable, containing a list of file paths where CMT packages can be found. The syntax of this search list follows the standard syntax of search lists, i.e. items are separated using a : character on Unix and a ; character on Windows.
When the software base is organized and configured using the CMTPROJECTPATH search list and project-use statements in the project files, this search list is automatically and internally generated by CMT, and therefore it should not be manually defined nor manipulated. If this is your case, you can skip this section
It is possible to manually define this search list (when CMTPROJECTPATH is not defined or when project files are not provided)
There should be one entry per package area, and the list is ordered. The order of items is used to prioritize the package search.
in .cmtrc files, which can be located either in the current directory, in the home directory of the developper or in ${CMTROOT}/mgr . The syntax to use in this configuration file is:
CMTPATH=/home/arnault/mydev:/ProjectB
In the Windows environment, this configuration parameter may also be installed as a Registry under the alternate keys:
HKEY_LOCAL_MACHINE/Software/CMT/path
HKEY_CURRENT_USER/Software/CMT/path
The project file (i.e. the file cmt/project.cmt ), when it exists for the current package (i.e. upstream in the directory hierarchy), also provides an automatic value for the CMTPATH search list.
We consider here the installation of a user package. Installing CMT itself requires special attention and is described in a dedicated section of this document.
Therefore, we assume that CMT is already installed in some location in the system. One first has to setupCMT in order to gain access to the various management utilities, using for example the shell command:
csh> source /lal/CMT/v1r18p20051101/mgr/setup.csh

or

ksh> . /lal/CMT/v1r18p20051101/mgr/setup.sh

or

dos> call \lal\CMT\v1r18p20051101\mgr\setup.bat
Obviously, this operation must be performed (once) before any other CMT action. Therefore it is often recommended to install this setup action straight in the login script.
The setup script used in this example is a constant in the CMT environment : every configured package will have one such setup script automatically generated and installed by CMT . It is one important entry point to any package (and thus to CMT itself). It provides environment variable definitions for all related (used ) packages (A corresponding cleanup script is also provided). This script contains a uniform mechanism for interpreting the ?requirements? file so as to dynamically define environment variables, aliases for the package itself and all its used packages. It is constructed once per package installation by the cmt create command, or restored by the cmt config command (if it has been lost).
It is generally good to start by immediately defining a project . This project is our first disk area where CMT packages will be located. Remember that several such projects can be set up and defined. The simplest way to do this is:
> cmt create_project Dev
------------------------------------------
Configuring environment for project Dev
CMT version v1r18p20051101.
------------------------------------------
Installing the cmt directory
Creating a new project file
This creates a project structure Dev/cmt/project.cmt from the current directory. Once this project has been created we have a complete environment to start creating packages below Dev and working out our software base.
A package is primarily defined by a name and a version identifier (this duet actually forms the complete package identifier ). These two attributes will be given as arguments to cmt create such as in the following example :
csh> cd Dev
csh> cmt create Foo v1
------------------------------------------
Configuring environment for package Foo version v1.
CMT version v1r18p20051101.                              [1]
Root set to /home/arnault/Dev.
System is Linux-i686                                     [2]
------------------------------------------
Installing the package directory                         [3]
Installing the version directory
Installing the cmt directory
Installing the src directory
Creating setup scripts.
Creating cleanup scripts.
This shows which actual CMT version you are currently using
This shows the current configuration tag (also available by the cmt system command). In this example this is a Linux machine
This shows the detailed construction of the complete directory structure, starting from the top directory which has the name of the package. Since we are creating a completely new package, there will be by default only two branches below the version directory : cmt and src .
The package creation occured from the current directory, creating from there the complete directory tree for this new package.
In the next example, we install the package in a completely different area, by explicitly specifying the path to it as a third argument to cmt create :
> cmt create Foo v1 /ProjectB
------------------------------------------
Configuring environment for package Foo version v1.
CMT version v1r18p20051101.
Root set to /ProjectB.
System is Linux-i686
------------------------------------------
Installing the path directory
Installing the package directory
Installing the version directory
Installing the cmt directory
Installing the src directory
Creating setup scripts.
Creating cleanup scripts.
Several file creations occurred at this level :
a minimal directory tree for the package, including src and cmt (the other branches will be installed when needed or generated at build time).
an empty configuration specification file (named requirements ) installed in the cmt branch.
A minimal Makefile (on Unix environments only), containing
include $(CMTROOT)/src/Makefile.header

include $(CMTROOT)/src/constituents.make
This Makefile does not need any further modification to build any of the constituents managed by CMT . The intermediate makefile fragments will always be re-generated transparently and automatically at build time. However (and thanks to this feature), this file will not be modified anymore by CMT itself. Thus you may insert any particular make statement you would feel appropriate, typically when you ask for operations that cannot be taken - if any - into account by CMT .
A similar minimal NMake file (on Windows environments only), containing
the setup and cleanup scripts (one flavour for each shell family).
One may then setup this new package by running the setup script (which will not have much effect yet since the requirements file is empty) :
sh> cd ~/mydev/Foo/v1/cmt
sh> . setup.sh
or
csh> cd ~/mydev/Foo/v1/cmt
csh> source setup.csh
or
dos> cd \mydev\Foo\v1\cmt
dos> call setup.bat
The FOOROOT and FOOCONFIG environment variables are defined automatically by this operation.
It should be noted that running the setup script of a package is not always necessary for building operations. The only situation where running this script may become useful, is when an application is to be run, while requiring domain specific environment variables defined in one of the used packages. Besides this particular situation, running the setup scripts may not be needed at all.
Lastly, this newly created package may be removed by the quite similar remove command, using exactly the same arguments as those used for creating the package.
csh> cd mydev
csh> cmt remove Foo v1
------------------------------------------
Removing package Foo version v1.
CMT version v1r18p20051101.
Root set to /home/arnault/mydev.
System is Linux-i686
------------------------------------------
Version v1 has been removed from /home/arnault/mydev/Foo
Package Foo has no more versions. Thus it has been removed.
or:
csh> cmt remove Foo v1 /ProjectB
------------------------------------------
Removing package Foo version v1.
CMT version v1r18p20051101.
Root set to /ProjectB.
System is Linux-i686
------------------------------------------
Version v1 has been removed from /ProjectB/Foo
Package Foo has no more versions. Thus it has been removed.
So far our package is not very useful since no constituent (application or library) is installed yet. You can jump to the section showing how to work on an application or on a library for details on these operations or we can roughly draw the sequence used to specify and build the simplest application we can think of as follows:
csh> cd ~/mydev/Foo/v1/cmt
csh> cat >../src/FooTest.c
#include

int main ()
{
  printf ("Hello Foo\n");
  return (0);
}

csh> vi requirements
...
application FooTest FooTest.c
csh> gmake
csh> source setup.csh
csh> FooTest.exe
Hello Foo
Directly running the application is possible since the application has been installed after being built in an automatic installation area reachable through the standard PATH environment variable
This can also be integrated in the build process by providing the -check option to the application definition:
csh> cd ../cmt
csh> vi requirements
...
application FooTest -check FooTest.c
csh> gmake check
Hello Foo
In the next sections, we'll see that packages reference each other by means of use relationships. Generally packages are found in different locations, according to the project - or sub-project - they belong to. CMT provides a quite flexible mechanism for localizing the referenced packages.
The first ingredient we need at this level is to understand how projects themselves are localized, since packages will be found inside project areas. You should therefore refer to the section on projects where the complete mechanism based on CMTPROJECTPATH or CMTPATH is described.
However, there is one special case where this path list can be avoided, i.e. when only one project is considered. In this case, the knowledge of this single project area can simply be deduced from the detection of the project file, created at the top of its disk space.
A given version of a given package is always referred to by using a use statement within its ?requirements? file. This statement should specify the package through three keys :
its name (such as Bar )
its version (such as v7r5 )
optionally its expected absolute location or relative offset
use Bar v7r5 [1]
or
use Bar v7r5 A [2]
or
use Bar v7r5 /ProjectB/A [3]
Given these keys, the referenced package is looked for according to a prioritized search list which is (in decreasing priority order) :
the absolute access path, if the use path is absolute (case #3),
the access paths registered in the configuration parameter CMTPATH (and in decreasing priority, the first element being searched for first).
If the path argument is specified as a relative path (case #2 above) (ie. there is no leading slash character or it's not a disk on windows machines), it will be used as an offset to each search case. The search is done starting from the list specified in the CMTPATH configuration parameter; and the offset is appended at each searched location.
As an example, if the CMTPATH parameter contains:
/home/arnault/mydev:/ProjectB
Then a use statement (defined within a given package) containing :
...
use Bar v7r5
use BarA v1 A
would look for the package Bar from :
/home/arnault/mydev/Bar/v7r5/cmt
/ProjectB/Bar/v7r5/cmt
Whereas the package BarA would be searched from :
/home/arnault/mydev/A/BarA/v1/cmt
/ProjectB/A/BarA/v1/cmt
The packages are searched assuming that the directory hierarchy below the access paths always follow the convention :
there is a first directory level exactly named according to the package name (this is case sensitive),
then (optionally) the next directory level is named according to the version tag,
then there is a branch named cmt ,
lastly there is a requirements file within this cmt branch.
Thus the list of access paths is searched for until these conditions are properly met.
The actual complete search list can always be visualized by the command:
> cmt show path
# Add path /home/arnault/dev from CMTPATH
# Add path /ProjectB from CMTPATH
#
/home/arnault/dev:/ProjectB
?7 - Assigning semantics to packages. Common practices
Generally speaking, CMT makes no assumption on how or why is used a package. However past experience has shown that packages can be categorized according to their purpose or their type of contents.
This is the most general and basic pakage type, which provides actual pieces of software, such as libraries or applications. Generally the main activities performed by such a package include building the software (compiling, linking), testing, generating the documentation, installing, ...
A typical package of that kind will contain:
a ../src directory containing the sources of the package
a directory for the include files, with a name that will depend on the structuring policies defined for the project. Tyical examples are
../include/
..//
a ../doc directory for the documentation
a ../test directory for the test programs.
The requirements file will generally contain at least library and application statements.
This kind of package only provides conventions, working methods, general purpose shell scripts but generally provides no software per se. It is designed to gather all policies and management conventions for a project or a sub project.
The basic contents of such a package is the requirements file including
strategy definitions
pattern definitions
general purpose symbol definitions
In principle the idea when such a policy package is defined, is that all packages of the project or of the sub-project will use it
Global patterns may be specified so as to automate the applying of basic policies and conventions.
Typical examples of policies that are profitably specified in such a package are:
include search path convention (using a global pattern with the include_dir statement)
build or setup strategies
compiler or linker generic options
defining the project-wide production tools (compiler, documentation generator, etc...)
tag associations need to describe the binary tag convention in the project
In large projects, it is even often desirable to split the policies into a set of specialized policies and to associate one dedicated policy package with each of those.
In large projects, it's often useful to decompose the software base into specialized domains (Core software, Graphics, Database, Online, etc...) or subsets of the software (eg per detector in a physics experiment). Then a container package consists in constructing a simple package with only one requirements file in it and only containing a set of use statements.
Management activities directly related with the associated sub-domain can then be undertaken through this special package:
version management (such as CVS tagging) of packages belonging to the domain
consistently building the domain
Generally the cmt broadcast command is widely exploited to perform those management activities.
Generally the use statements installed in a container package make use of explicit version specification (and prohibit wild carding) since each version of this container package acts as a reference of the set of version tags validated for the packages of the domain.
This package is one particular example of the container concept, but dedicated to manage the project-wide activities. This release package is the primary target of the project manager. It will generally receive as its version tags the version tags assigned to the project releases themselves.
This kind of package defines an interface to an existing software product not managed in the context of the project itself. Typical examples concern:
packages shared from external projects that don't use CMT as their configuration tool
third party software (free software, commercial products, ...) locally installed on the development platform.
The primary goal fo such a glue package is to convert the management conventions and policies expected by the referenced product to the ones appropriate for the current project.
compiler and linker options
run time settings such as environment variable definitions (PATH , LD_LIBRARY_PATH , etc..)
data file access
specification of local installation according to the project strategy
Generally this kind of package only provides a requirements file, or make fragments used to automate some actions (typically when document generation is expected from thie interfaced product)
?8 - Managing site dependent features - The CMTSITE environment variable
Software bases managed by CMT are often replicated to multiple geographically distant sites (as opposed to machines connected through AFS-like WAN). In this kind of situation, some of the configuration parameters (generally those used for instance to reference local installations of external software) take different values.
The CMTSITE environment variable or registry in Windows environments, is entirely under the control of the site manager and can be set with a value representing the site (typical values may be LAL , Virgo , Atlas , LHCb , CERN , etc.).
This variable, when set, corresponds to a tag which can be used to select different values for make macros or environment variables.
A typical use for this tag is to build up actual values for the location path of an external software package. Here we take the example of the Anaphe utility:
The first ingredient of a proper package configuration is the set of configuration parameters which has to be specified in a text file uniquely named ?requirements? and necessarily installed in the cmt branch of the package directory tree.
An empty version of this file is automatically created the first time the package is installed, and the package manager is expected to augment it with configuration specifications.
The primary goal of this configuration file is to specify any configuration information for this package. There is virtually no limit to what could be specified there. And we can expect to find exhaustive information about:
the primary constituents of the package
how to rebuild the software
how to setup and use the software
how to transport and deploy the package
Many configuration parameters are supposed to be described into this ?requirements? file - see the detailed syntax specifications here - namely :
the package information about its author(s) and manager(s)
the relationships with other packages
the package constituents (libraries, applications, documents, etc.)
the policy patterns to be applied by clients of this package
the parameterization of the tools used in the build process (eg. make macros)
the parameterization of the run-time activity (eg. environment variables, search paths, etc.)
Generally, every such appropriate parameter will be deduced on demand from the ?requirements? file(s) through the various query functions available from the cmt main driver. Therefore there is no systematic package re-configuration per se, besides the very first time a package is newly installed in its location (using the cmt create action).
Query actions (generally provided using the cmt show ...family of commands) are to be embedded in the various productivity tools, such as the setup shell scripts, or makefile fragment generators.
These query actions always interpret the set of ?requirements? files obtained from the current package and from the packages in the effective used chain. Symbols, tags and other definitions are then computed and built up according to inheritance-like mechanisms set up between used packages.
Conversely one may say that parameters defined in a ?requirements? file are meant to be exported to the clients of the package.
Other configuration parameters are also optionally inserted from the HOME and USERcontext requirements files
Typical examples of these query functions are:
cmt setup builds a shell command line for setting up environment variables
cmt show projects gives the ordered sequence of sub-projects comprising the complete software base
cmt show macros construct the effective set of inherited make macros
cmt show uses gives the ordered and flattened set of used packages
cmt show constituents lists the package's constituents
cmt show path lists the effective search path for packages.
cmt show strategies shows the current setup of various functional CMT strategies.
cmt show setup combines in one display the result of uses , tags and path
A configuration describes the conditions in which the package has to be built (ie. compiled and linked) or applications can be run. This configuration can depend on :
the operating system (such as Linux , Windows , ...)
the platform (such as Intel , Compaq , Sun , etc...)
the sub-project into which a package is inserted
the choice of the compiler (such as g++ , egcs , CC , etc...)
options used for compiling (such as optimizer , debugger , etc...) or linking
the context specifications (selecting a particular version of a firmware, selecting a database server, ...)
the site itself
the context of a constituent during its rebuild operation
Carefully describing this configuration is essential both for maintenance operations (so as to remember the precise conditions in which the package was built) and when the development area is shared between machines running different operating systems, or when a project has to be deployed on several sites.
CMT relies on several complementary conventions or mechanisms for this description and the associated management. All these conventions rely on the concept of configuration tags .
A tag is a symbol that describes one aspect of the configuration.
A tag can be active when the corresponding aspect of the configuration is true or inactive otherwise
The set of active tags represents the complete configuration known by CMT, and can be visualized with the cmt show tags command
Tags can be combined using logical expressions to form tag associations
Some aspects of the configuration - and their associated tags - are automatically deduced from some standard environment variables that the user is expected to specify (typically using shell commands):
CMTCONFIG describes the current settings for producing binary objects. One default value is provided automatically by CMT, but generally project will override it to apply specific conventions.
The default value is computed by CMT in the ${CMTROOT}/mgr/cmt_system.sh shell script.
This script automatically builds a value characterizing both the machine type and the opebrating system type (using a mixing of the uname standard UNIX command with various operating system specific definitions such as the AFS based fs sysname command)
CMTSITE characterizes the current site. Its syntax is completely free
CMTEXTRATAGS may contain a space-separated list of additional tags to systematically activate
Note that the CMTBIN variable which represents the current binary installation of CMT itself does NOT correspond to any tag.
Some aspects of the configuration represents the implicit knowledge CMT gets of the current context:
The value given by the uname standard Unix facility is always a valid configuration tag. (eg. Linux )
The current major version id of CMT is a valid tag and takes the form CMTv (eg. CMTv1 )
The current minor version id of CMT is a valid tag and takes the form CMTr (eg. CMTr18 )
The current patch id of CMT is a valid tag and takes the form CMTp (eg. CMTp20030616 )
The current sub-project to which the current package belongs, and the various tags automatically generated by CMT to qualify the strategy options.
The current hardware understood as filled in the cmt_hardware macro
The current OS understood as filled in the cmt_system_version macro
The version of the C++ compiler understood as filled in the cmt_compiler_version macro
During a make session, each individual target being rebuilt may define its own context, when the -target_tag is set to the associated constituent, and this is materialized with a dedicated tag named target_ .
For instance, a package defines a library A and an application P , both in the default group. Both constituents have their -target_tag option set. Thus, when the standard make command is run, then those two targets will be rebuilt successively (eg A then B ). Then, during the build of A (and only then) the tag named target_A will be active and during the build of B , the tag named target_B will in turn be active.
library A -target_tag A.cxx
application P -target_tag P.cxx

macro_append cppflags "" target_A "-DA" target_P "-DP"
During the execution of an action , a specific context is created, which is materialized with a dedicated tag named target_ , very similarly to the target tags for constituents.
User defined tags can be explicitly or implicitly activated:
explicitly from the cmt command line, using the -tag= option
explictly from requirements files using the apply_tag syntax
implicitly from requirements files using the tag association syntax, when a tag is associated with an otherwise activated tag. One example is the Unix tag associated by CMT itself with most Unix variants
The minimal tag set available from CMT can be visualized as follows (note that the exact output will obviously not necessarily be the one presented in this document according to the context effectively used):
The user configuration tags can generally be specified though various complementary mechanisms:
CMTSITE and CMTCONFIG can be specified using standard shell commands (setenv, export, set)
sh> export CMTSITE=CERN
CMTSITE and CMTCONFIG can alternatively be specified using the set statement in a requirements file
set CMTSITE "CERN"
set CMTCONFIG "${CMTBIN}" sun "Solaris-CC-dbg"
Additional tags may also be associated with other tags, using the tag statement (in a requirements file):
tag newtag tag1 tag2 tag3
which means that:
newtag defines a tag (inactive by default)
when newtag is active, then both tag1, tag2 and tag3 are simultaneously active
Tags may be declared as exclusive using the tag_exclude syntax.
tag_exclude debug optimized
This example implies that the two tags debug and optimized should never become active simultaneously.
Tags are assigned priorities according to the way they have been defined. The priority is particularly useful for specifying exclusion. The tag association promotes the priority of the associated tags to the priority of the defining tag. The following decreasing priorities are currently defined by CMT:
tag specified in the command line using the -tag= option
tag deduced from CMTCONFIG
tag defined in a requirements file using the tag syntax
By default, CMTCONFIG , uname and CMTSITE (also named system tags) are always active.
The tag associated with the current project name as well as those describing the strategy properties of all projects are also always active.
The target tags associated with constituents (when the -target_tag option was set on them) or with actions are automatically activated during the build of the constituent or during the execution of the action.
It is possible to activate other tags through the following arguments to any cmt command:
-tag=
will cleanup the complete current tag set, and activate the new tags (the system tags are restored).
-tag_add=
will add to the current tag set the tags specified in the comma separated list
-tag_remove=
will remove from the current tag set the tags specified in the comma separated list
Beware that giving these arguments generally make the selected tag set active only during the selected command. Therefore two different CMT commands run with different tag sets will generally yield different results.
However it's often useful to state that a given tag or tag set should be active. This can be obtained by the following mechanisms:
Forcing a tag in a requirements file using the apply_tag ?syntax
Eg the following syntax installed in a requirements file will force the tag foo :
In this section, we'll see, through a quite simple scenario, the typical operations generally needed for installing, defining and building a package. We are continuing the example of the Foo package already used in this document.
Let's assume, as a first example, that the Foo package is originally composed of one library libFoo.a itself made from two sources : FooA.c and FooB.c . A shared flavour of the library libFoo.so or libFoo.sl or libFoo.dll ) is also foreseen.
The minimal set of branches provided by CMT (once the cmt create operation has been performed) for a package includes src for the sources and cmt for the Makefiles and other scripts.
The various tools CMT provide will be fully exploited if one respects the roles these branches have to play. However it is always possible to extend the default understanding CMT gets on the package by appropriate modifiers (typically by overriding standard macros).
Assuming the conventional usage is selected, the steps described in this section can be undertaken in order to actually develop a software package.
We first have to create the two source files into the src branch (typically using our favourite text editor). Then a description of the expected library (ie. built from these two source files) will be entered into the requirements file. The minimal syntax required in our example will be :
csh> cd ../cmt
csh> vi requirements             (1)
library Foo FooA.cxx FooB.cxx
the ?requirements? file located in the cmt branch of the package receives the description of this library component. This is done using one library statement.
The cmt create command had generated a simple Makefile (or NMake file) which is generaly sufficient for all standard operations, since CMT continuously and transparently manages the automatic reconstruction of all intermediate makefile fragments. We therefore simply and immediately execute gmake as follows:
...v1/cmt> gmake QUIET=1
------> (Makefile.header) Rebuilding constituents.make
------> (constituents.make) Rebuilding setup.make Linux-i686.make         [1]
setup.make ok
------> (constituents.make) Rebuilding library links
------> (constituents.make) all done
------> (constituents.make) Building Foo.make                             [2]
Library Foo
------> (constituents.make) Starting Foo
------> (Foo.make) Rebuilding ../Linux-i686/Foo_dependencies.make         [3]
rebuilding ../Linux-i686/FooA.o
rebuilding ../Linux-i686/FooB.o
rebuilding library
------> Foo : library ok
------> Foo ok
Installing library libFoo.so into /home/arnault/mydev/InstallArea/Linux-i686/lib
installation done                                                         [4]
------> (constituents.make) Foo done
 all ok.
Linux-i686.make ok
gmake[2]: `config' is up to date.
gmake[2]: `all' is up to date.
Some intermediate makefile fragments are automatically built to reflect the current effective set of Makefile macros deduced from the configuration (read from the ?requirements? file). These fragments are automatically rebuilt (if needed) each time one of the ?requirements? file changes.
Each component of the package (be it a particular library or a particular executable ) will have its own makefile fragment (named ../${CMTCONFIG}/.[n]mak[e] ). This dedicated makefile takes care of filling up the library and creating the shared library (on the systems where this is possible).
The directory which is used for the binaries (i.e. the results of compilation or the libraries) has been automatically created by a generic target (dirs ) which is defined within [N]Makefile.header . A new binary directory will be created each time a new value of the CMTCONFIG environment variable is defined or a tag is provided on the command line to make .
An automatic installation mechanism is applied for all successfully built binaries.
or, for nmake:
...v1/cmt> nmake /f nmake
This mechanism relies on some conventional macros and incremental targets used within the specific makefiles. Some are automatically generated, some have to be specified in user packages. It's quite important to understand the list of possible customization macros, since this is the main communication medium between CMT and the package manager. See the complete table of those conventional macro when you want to interact with the standard CMT behaviour.
However, it is also possibble to use a simplified and platform independent form to build a constituent
...v1/cmt> cmt make
This syntax is identical on all platforms, and also does not require any cmt config nor source setup operation
Assume we now want to add a test program to our development. Then we create a FooTest.cxx source, and generate the associated makefile (specifying that it will be an executable instead of a library) :
csh> cd ../src
csh> emacs FooTest.cxx
...
csh> cd ../cmt
csh> vi requirements
...
application FooTest FooTest.cxx
So that we may simply build the complete stuff by running :
> cmt make QUIET=1
------> (Makefile.header) Rebuilding constituents.make
------> (constituents.make) Rebuilding setup.make Linux-i686.make
setup.make ok
------> (constituents.make) Rebuilding library links
------> (constituents.make) all done
------> (constituents.make) Building Foo.make
Library Foo
------> (constituents.make) Starting Foo
------> Foo : library ok
------> Foo ok
installation done
------> (constituents.make) Foo done
------> (constituents.make) Building FooTest.make
Application FooTest
------> (constituents.make) Starting FooTest
------> (FooTest.make) Rebuilding ../Linux-i686/FooTest_dependencies.make
rebuilding ../Linux-i686/FooTest.o
rebuilding ../Linux-i686/FooTest.exe
------> FooTest ok
Installing application FooTest.exe into /home/arnault/mydev/InstallArea/Linux-i686/bin
installation done
------> (constituents.make) FooTest done
 all ok.
Linux-i686.make ok
gmake[2]: `config' is up to date.
gmake[2]: `all' is up to date.
Which shows that a program FooTest.exe has been built from our sources. Assuming now that this program needs to access the Foo library, we'll just add the following definition in the ?requirements? file :
The Foo_linkopts conventional macro will be automatically inserted within the use_linkopts macro. And the shared library location will be automatically set to the installation areas.
It is also possible to select extra tag sets when running gmake as follows (in this example we first cleanup the previous build and rebuild with debug options added to the compiler and linker commands) :
> cmt make clean
> cmt make CMTEXTRATAGS=debug
Like all other make macros used to build a component, the Foo_linkopts will be specified within the ?requirements? which gives several benefits:
variants of the macro definition can be provided
monitoring features of CMT such as the cmt show macro Foo_linkopts command can be used later on
macros defined this way may be later on inherited by client packages which will use our package.
It is also possible to work on a test or external application, ie. when one does not wish to configure the development for this application using CMT . Even in this case, it is possible to benefit from the packages configured using CMT by partially using CMT , just for used relationships.
Here, no special convention is assumed on the location of the sources, the binaries, the management scripts, etc... However, it is possible to describe in a ?requirements? file the use relationships, as well as the make macro definitions, quite similarly to the package entirely configured using CMT .
Most of the options provided by the cmt user interface are still available in these conditions.
In a Unix environment, documents are built using make (well generally its gnu flavour) or nmake in Windows environments. The basic mechanism provided in CMT relies on make fragment patterns containing instructions on how to rebuild document pieces. Many such generators are provided by CMT itself so as to take care of of the most usual cases (e.g. compilations, link operations, archive manipulations, etc...). In addition to those, any package has to possibility to provide a new generator for its own purpose, i.e. either for providing rules for a special kind of document, or even to override the default ones provided by CMT . This mechanism is very similar to the definition or re-definition of macros or environment variables in that every new generator has to be first declared in a ?requirements? file belonging to a package (CMT actually declares all its default generators within its ?requirements? file), allowing all its client packages to transparently acquire the capacity to generate documents of that sort.
CMT manages two categories of constituents:
Applications and Libraries are handled using pre-defined make fragments (mainly related with languages) and behaviour.
Documents offer a quite general framework for introducing completely new behaviours through user-defined make fragments. This includes actually generating documents, but also simply performing an operation (in which case sometimes no real document is produced).
In this section we only discuss the latter category and the following paragraphs explain the framework used for defining new document types.
The main concept of this framework is that each document to be generated or manipulated must be associated with a "document-type" (also sometimes named "document-style"), which corresponds to a dedicated make fragment of that name. Then, when specified in a document statement, this make fragment will be instanciated once or several times (typically once per source file) to construct a complete and functional make fragment, containing one main target. Both the resulting make fragment and the make target will have the name of the constituent.
This section discusses one simple example (the production of postscript from latex files) available in the standard CMT distribution kit.
Converting a latex source file into a postcript output implies to chain two text processors, with an intermediate dvi format.
The fragment described here exactly performs this sequence, taking care of intermediate file deletion. The document style is named "tex" (the associated fragment shown here and named "tex" is actually provided by CMT itself, and can be looked at in ${CMTROOT}/fragments/tex .) :
============ tex =====================================
${CONSTITUENT} :: ${FILEPATH}/${NAME}.ps

${FILEPATH}/${NAME}.dvi : ${FULLNAME}
        cd ${doc}; latex ${FULLNAME}

${FILEPATH}/${NAME}.ps : ${FILEPATH}/${NAME}.dvi
        cd ${doc}; dvips ${FILEPATH}/${NAME}.dvi

${CONSTITUENT}clean ::
        cd $(doc); /bin/rm -f ${FILEPATH}/${NAME}.ps ${FILEPATH}/${NAME}.dvi

======================================================
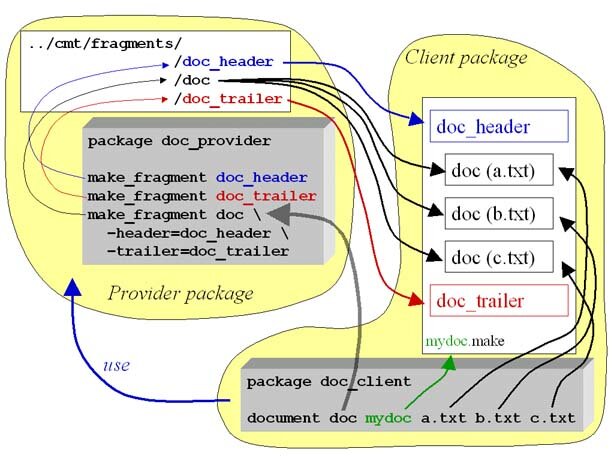
They are declared in the CMT 's requirements file as follows :
make_fragment tex -header=tex_header
where:
"tex" represents both the fragment name and the document style.
the -header=tex_header option indicates that the generated makefile fragment will first include this header (which is actually an empty file in this case)
A user package willing to apply this behaviour will have to include in its ?requirements? file a statement similar to the following:
document tex MyDoc -s=../doc doc1.tex doc2.tex
where:
The first parameter "tex" is the document-style
The second parameter "MyDoc" is used for building the constituent's makefile (under the name MyDoc.make) and for providing the make target "MyDoc".
The other parameters (doc1.tex and doc2.tex) are the sources of the document. Explicit location is required (since default is currently defined to be ../src)
The constituent's makefile MyDoc.make is built as follows :
Install a copy of the $CMTROOT/fragments/make_header generic fragment
Install a copy of the $CMTROOT/fragments/tex_header fragment
For each of the sources, install a copy of the fragment "tex"
Install a copy of the $CMTROOT/fragments/cleanup_header fragment
The result for our example is:
=========== MyDoc.make ===============================

#====================================
#  Document MyDoc
#
#   Generated   by
#
#====================================

help ::
@echo 'MyDoc'

doc1_dependencies = ../doc/doc1.tex
doc2_dependencies = ../doc/doc2.tex

MyDoc :: ../doc/doc1.ps

../doc/doc1.dvi : $(doc)doc1.tex
        cd ${doc}; latex $(doc)doc1.tex

../doc/doc1.ps : ../doc/doc1.dvi
        cd ${doc}; dvips ../doc/doc1.dvi

MyDocclean ::
        cd $(doc); /bin/rm -f ../doc/doc1.ps ../doc/doc1.dvi

MyDoc :: ../doc/doc2.ps

../doc/doc2.dvi : $(doc)doc2.tex
        cd ${doc}; latex $(doc)doc2.tex

../doc/doc2.ps : ../doc/doc2.dvi
        cd ${doc}; dvips ../doc/doc2.dvi

MyDocclean ::
        cd $(doc); /bin/rm -f ../doc/doc2.ps ../doc/doc2.dvi

clean :: MyDocclean
        cd .

MyDocclean ::
======================================================
12.?2 - How to create and install a new document style
This section presents the general framework for designing a document generator.
Select a name for the document style. It should not clash with existing ones (use the cmt show fragments for a complete list of document types currently defined).
A fragment exactly named after the document style name must be installed into a subdirectory named fragments below the cmt branch of a given package (which becomes the provider package).
Optionally, two other fragments may be installed into the same subdirectory, one of them will be the header of the generated complete fragment, the other will be its trailer
Those fragments must be declared in the ?requirements? file of the provider package as follows:
make_fragment [ options... ]
where options may be :
-suffix=
provide the suffix of the output files (without the dot)
-header=
provide another make fragment meant to be prepended to the constituent's make fragment.
-trailer=
provide another make fragment meant to be appended to the constituent's make fragment.
-dependencies
install the automatic generation of dependencies into the constituent's make fragment
Once a fragment is installed and declared, it may be used by any client package (ie a package using the provider), and queried upon using the command
> cmt show fragment
which will show where this fragment is defined (ie. in which of the used packages).
The cmt show fragments commands lists all declared fragments.
If a package re-defines an already declared make fragment, ie it provides a new copy of the fragment (possibly with new copies of the header and the trailer), and declares it inside its requirements file, then this package becomes the new provider for the document style.
For building a fragment, one may use pre-defined generic "templates" (which will be substituted when a fragment is copied into the final constituent's makefile).
CONSTITUENT
the constituent name
CONSTITUENTSUFFIX
the optional constituent's output suffix
FULLNAME
the full source path name (including directory and suffix)
FILENAME
the complete source file name (only including the suffix)
NAME
the short source file name (without directory and suffix)
FILEPATH
the source directory
SUFFIX
the suffix provided in the -suffix option
OBJS
(only available in headers) the list of outputs, formed by a set of expressions :
$(${CONSTITUENT}_output)${NAME}${SUFFIX}
Templates must be enclosed between ${ and } or between $( and ) and will be substituted at the generation time. Thus, if a fragment contains the following text :
$(${CONSTITUENT}_output)${NAME}${SUFFIX}
then, the expanded constituent's makefile will contain (refering to the "tex" example)
$(MyDoc_output)doc1.ps
Which shows that make macros may be dynamically generated.
and the general cmt user interface, available in the mgr branch of the CMT package.
The setup script found in the CMT installation directory actually adds its location to the definition of the standard UNIXPATH environment variable in order to give direct access to the main cmt user interface.
The sections below will detail the complete syntax of the ?requirements? file since it is the basis of most information required to run the tools as well as the main commands available through the cmt user interface.
A requirements file is made of statements , each describing one named configuration parameter.
Statements generally occupy one single line, but may be split into several lines using the reverse-slash character (in this case the reverse-slash character must be the last character on the line or must be only followed by space characters).
Each statement is composed of words separated with spaces or tabulations.
The first word of a statement is the name of the configuration parameter.
The rest of the statement provides the value assigned to the configuration parameter.
Words composing a statement are separated with space or tab characters. They may also be enclosed in quotes when they have to include space or tab characters. Single or double quotes may be freely used, as long as the same type of quote is used on both sides of the word.
Special characters (tabs, carriage-return and line-feed) may be inserted into the statements using an XML-based convention:
tabulation
carriage-return
line-feed
Comments : they start with the # character and extend up to the end of the current line.
The complete syntax specification is available in Appendix .
13.?2 - The concepts handled in the requirements file
Packages are installed in a directory structure that can optionnally include a version directory (just after the top directory of the package name). This is controlled through the structuring style or structuring strategy parameters specified using one of the following means:
Through the environment variable CMTSTRUCTURINGSTYLE taking one of the alternate values:
with_version_directory
without_version_directory
Through the command line options -with_version_directory or -without_version_directory
Through the structure_strategy specification entered into the project file of the current project, using the alternate values:
with_version_directory
without_version_directory
It should be noted that the command line option will take precedence over the strategy specification, in case of conflict.
Describe the composition of a constituent. Application and library correspond to the standard meaning of an application (an executable) and a library, while document provides for a quite generic and open mechanism for describing any type of document that can be generated from sources.
Applications and libraries are assigned a name (which will correspond to a generated make fragment, and a dedicated make target).
A document is first associated with a document type (which must correspond to a previously declared make fragment). The document name is then used to name a dedicated make fragment and a make target.
Various options can be used when declaring a constituent:
specify an exclusion regular expression to be applied to the sources (1)
-k=regexp
any
specify a finer selection regular expression to be applied to the sources (1)
-no_share
libraries
do not generate the shared library
-no_static
libraries
do not generate the static library (not yet implemented )
-prototypes
applications, libraries
do generate the prototype header files
-no_prototypes
applications, libraries
do not generate the prototype header files
-check
applications
generate a check target meant to execute the rebuilt application
-group=
any
install the constituent within this group target
-suffix=
applications, libraries
provide a suffix to names of all object files generated for this constituent (2)
-import=
applications, libraries
explicitly import for this constituent the standard macros from a package that has the -no_auto_imports option set
-target_tag
any
construct a specific tag named target_ . This tag will only be active during the make session for this constituent. (4)
-windows
applications
When used in a Windows environment, generates a GUI-based application (rather than a console application)
=
any
define a variable and its value to be given to the make fragment (3)
The sources of the constituents are generally specified as a set of file names with their suffixes, and are by default expected from the ../src directory
library A A.cxx B.cxx
Then it is possible to change the default search location as well as to use a simplified wildcarding syntax:
library A -s=A *.cxx -s=B *.cxx
-s=A means that next source files should be taken searched from ../src/A
-s=B means that next source files should be taken searched from ../src/B . Note that this new specification is not relative to the previous -s=A but relative to the default search path ../src
*.cxx indicates that all files with a .cxx suffix in the current search path should be considered
It's also possible to select or exclude files using regular expressions from general wildcarding techniques:
library A -s=A -x=[0-9] *.cxx -s=B -k=^B *.cxx
The exclusion specification -x=[0-9] added to the statement will exclude all files from ../src/A containing a number in their name.
The selection specification -k=^B added to the statement will select files from ../src/B strictly starting with the B letter.
When several constituents need to share source files, (a typical example is for building different libraries from the same sources but with different compiler options), it is possible to specify an optional output suffix with the -suffix= option. With this option, every object file name will be automatically suffixed by the character string " ", avoiding name conflicts between the different targets, as in the following example:
It's possible to specify in the list of parameters one or more pairs of variable-name =variable-value (without any space characters around the "=" character), such as in the next example:
This makefile fragment is meant to contain some text conversion actions and defines a document type named doc_to_html .
This constituent exploits the document type doc_to_html to convert the source FooA.doc into an html file.
The user defined template variable named output is specified and assigned the value FooA.html . If the fragment doc_to_html contains the string ${output} , then it will be substituted to this value.
For any constituent that has the -target_tag option set, a dedicated tag named target_ is automatically constructed by CMT. This tag becomes active during the construction of this constituent when using make , and therefore can be used as any other tag to select symbol values, or other configuration parameters.
Groups permit the organization of the constituents that must be consistently built at the same development phases or with similar constraints.
Each group is associated with a make target (of the same name) which, when used in the make command, selectively rebuilds all constituents of this group.
The default group (into which all constituents are installed by default) is named all , therefore, running make without argument, activates the default target (ie. all ).
As a typical usage of this mechanism, one may examplify the case in which one or several constituents are making use of one special facility (such as a database service, real-time features, graphical libraries) and therefore might require a controled re-build. This is especially useful for having these constituents only rebuilt on demand rather than rebuilt automatically when the default make command is run.
One could, for instance specify within the requirements file :
# Constituents belonging to the default all group

... constituents without group specification ...
library Foo *.cxx

# Constituents belonging to specific groups

library Foo-objy -group=objy <sources making use of Objectivity>

application FooGUI -group=graphics <sources making use of Qt>
application BarGUI -group=graphics <sources making use of Qt>
(Beware of the position of the -group option which must be located after the constituent name. Any other position will be misunderstood by CMT)
Then, running gmake all would only rebuild the un-grouped constituents, whereas running
> gmake objy
> gmake graphics
in the context of the Foo package would rebuild objy related or graphics related constituents.
Some computer languages are known by default by CMT (C , C ++, Fortran77 , Java , lex , yacc ). However it is possible to extend this knowledge to any other langage.
We consider here languages that are able to produce object files from sources.
Let's take an example. We would like to install support for Fortran90. We first have to declare this new language support to CMT within the requirements file of one of our packages (Notice that it's not at all required to modify CMT itself since all clients of the selected package will inherit the knowledge of this language).
The language support is simply named fortran90 and is declared by the following statement:
The recognized suffixes for source files will be f90 and F90
The linker command used to build a Fortran90 application is described inside the macro named f90link (which must defined in this requirements file but which can also be overridden by clients)
The language support being named fortran90 , two associated make fragments are expected, one under the name fortran90 (for building application modules), the other with the name fortran90_library (for modules meant to be archived), both without extension.
These two fragments should be installed in the fragments sub-directory of the cmt branch of our package.
Due to the similarity of the example to fortran77, we may easily provide the expected fragments simply by copying the f77 fragments found in CMT (thus the fragments ${CMTROOT}/fragments/fortran and ${CMTROOT}/fragments/fortran_library
These fragments make use of the fcomp macro, which holds the fortran77 compiler command (through the for macro).
Some languages (this has been seen for example in the IDL generators in Corba environments) do provide several object files from one unique source file. It is possible to specify this feature through the (repetitive) -extra_output_suffix option like in:
language idl -suffix=idl -fragment=idl -extra_output_suffix=_skel
where, in this case, two object files are produced for each IDL source file, one named <name >.o the other named <name >_skel.o .
This is a generic concept supporting the notion of valued symbols. Several alternate semantics are implemented by these symbols, all specified using the same syntactic schema, but leading to different behaviours or interpretations by CMT:
The set keyword is translated into an environment variable definition.
The macro keyword is translated into a make 's macro definition.
The path keyword is translated into a prioritized path -like environment variable, which is supposed to be composed of search paths separated with colon characters ':' (on Unix) or semi-colon characters ';' (on Windows). It is generally recommended to construct such a variable by iteratively concatenating individual items one by one using path_append or path_prepend
The action keyword is translated into a shell command definition, that can be activated using the cmt do command or the associated make target.
The alias keyword is translated into a shell alias definition,
Variants of these keywords are also provided for modifying already defined symbols. This generally happens when a package needs to modify (append, prepend or subtract) an inherited symbol (ie. which has been already defined by a used package).
The translations occur while running either the setup scripts (for alias, set or path) or the make command (for macro and actions).
Values are generally quoted strings (using either simple or double quotes). They may be unquoted only if they are composed of one single non-empty word, since the general syntax parsing relies on space separated words.
The default-value is mandatory (although it can be an empty string) optionally followed by a set of tag/value pairs, each representing an alternate value for this symbol.
Each tag-value pair describes an alternate value to be used when the corresponding tag or tag-expression is active.
When several alternate values are specified through several tag-value pairs the first matching condition is selected. Therefore one should always specify the most contraining condition first.
The removal operations can be specified using either plain sub-strings or regular rexpressions. One should notice that even for the path_remove_regexp operation, full regular expression are expected rather than file-system wild carding syntaxes.
The path_remove keyword is slightly specialized since it removes all individual search paths that contain the specified sub-string.
Be aware that there is only one name space for all kinds of symbols. Therefore, if a symbol was originally defined using a macro statement, using set_append to modify it will produce an undefined result (and a warning message).
The tag expression is used to select one alternate value to replace the default value, using the following matching rule:
The first matching condition in the ordered list of alternate values is selected, ignoring the following ones
A tag expression matches when all tags in the expression are active.
Actions are one of the possible symbols. Their definition as said previously follow the generic conventions for any symbol type, and they implement the concept of a generic shell command.
Like other symbols, actions can be visualized using the cmt show actions or the cmt show action command.
Some specialized mechanims are available on actions, in order to execute in various ways the corresponding shell commands.
Actually two operating modes are supported:
Immediate mode
This can be done via the cmt do command:
> cmt
or, when the action name conflicts with a native CMT keyword,
> cmt do
This mode immediately executes the specified command, after locally setting all environment variables known from the current package.
Through make
> cmt make
Actions are always associated with a make target of the same name
Action are always defined under a constituent group named cmt_actions . This means that action targets are never activated by default. Instead they must be explicitly called.
Action targets can be made dependent to other make targets (or vice versa), similarly to other constituents (libraries, applications, documents), using the _dependencies macro.
Example 1
library A ...
action B ...
macro B_dependencies " A "
In this example when doing gmake B , the library A will be rebuilt first.
Example 2
library A ...
action B ...
macro A_dependencies " B "
In this example when doing gmake A (or simply gmake ), the action B will be executed first.
Describe the relationships with other packages; the generic syntax is :
use [ [ ] ] [ -no_auto_imports= ... ]
Omitting the version specification means that the most recent version (ie. the one with highest ids) that can be found from the search path list will be automatically selected.
The offset specification can be relative (i.e. on Unix it does not contain a leading '/' character). In this case, this offset is systematically considered when the package is looked for in the search path list. But it can also be absolute (ie. with a leading '/' character on Unix), in which case this path takes precedence over the standard search path list (see CMTPATH).
The additional -no_auto_imports options suppress the automatic inheritance of some standard parameters from the specified used packages, such as include paths, compiler flags, ...
Examples of such relationships are :
use OnX v5r2
use CSet v2r3
use Gb v2r1

# A package installed in a sub-directory one step below the root :
use CS v3r1 virgo

# Back to the default root :
use Cm v7r3

# Get the most recent version of CERNLIB
use CERNLIB
By default, a set of standard macros, which are expected to be specified by used packages, is automatically imported from them (see the detailed list of these macros). This automatic feature can be discarded using the -no_auto_imports option to the use statement, or re-activated using the -auto_imports . When it is discarded, the macros will not be transparently inherited, but rather, each individual constituent willing to make use of them will have to explicitly import them using the -import=<package >option .
When a use statement is in a private section, the corresponding used package will only be reached if when CMT operations occur in the context of the holder package. Otherwise (ie if the operation occurs in some upper level client package), then this privately used package will be entirely hidden. (This behaviour follows a very similar pattern to the private or public inheritance of C++ ). Suppose we have the following organization:
----------------
package A

use B v1
use D v1
----------------

----------------
package B

private
use C v1
use D v1
----------------
all operations done in the context of package B will see both packages C and D
all operations done in the context of package A will see both packages B and D, but not package C
Often, similar configuration items are needed over a set of packages (sometimes over all packages of a project). This reflects either similarities between packages or generic conventions established by a project or a team.
Typical examples are the definition of the search path for shared libraries (through the LD_LIBRARY_PATH environment variable), the systematic production of test applications, etc.
The concept of pattern proposed here implements this genericity. Patterns may be either global , in which case they will be systematically applied onto every package, or local (the default) in which case they will be applied on demand only by each package.
The general principle of a pattern is to associate a templated (set of) cmt statement(s) with the pattern name. Then every time the pattern is applied, its associated statements are applied as if they were directly specified in the requirements file, replacing the template with its current value. If several statements are to be associated with a given pattern, they will be separated with the " ; " separator pattern (beware of really enclosing the ; character between two space characters).
The general syntax for defining a pattern in a requirements file is:
Pattern templates are names enclosed between the < and > characters. A set of predefined templates are automatically provided by CMT :
package
the name of the current package
PACKAGE
the name of the current package in upper case
version
the version tag of the current package
path
the access path of the current package
project
the project name of the current package
Then, in addition, user defined templates can be installed within the pattern definitions. Their actual value will be provided as arguments to the apply_pattern statement.
User defined templates that have not been assigned a value when the pattern is applied are simply ignored (ie. replaced with an empty string).
Some examples:
Changing the standard include search path.
The standard include path is set by default to ${_root}/src . However, often projects need to override this default convention, and typical example is to set it to a branch named with the package name. This convention is easily applied by defining a pattern which will apply the include_path statement as follows:
For instance, a package named PackA will expand this pattern as follows:
include_path ${PackA_root}/PackA/
Providing a value to the LD_LIBRARY_PATH environment variable
On some operating systems (eg. Linux), shared library paths must be explicited, through an environment variable. The following pattern can automate this operation:
In this example, the pattern was not set global, so that only packages actually providing shared libraries would be concerned. These packages will simply have to apply the pattern as follows:
apply_pattern ld_library_path
The schema installed by this pattern provides first a cleanup of the LD_LIBRARY_PATH environment variable and then the new assignment. This choice is useful in this case to avoid conflicting definitions from two different versions of the same package.
Installing a systematic test application in all packages
Quality assurance requirements might specify that every package should provide a test program. One way to enforce this is to build a global pattern declaring this application. Then every make command would naturally ensure its actual presence.
pattern quality_test application test test.cxx
In this example, an additional pattern () permits the package to specify extra source files to the test application (the pattern assumes at least one source file test.cxx).
According to whether the -global qualifier was used in the pattern definition, the aplication mode will be completely different.
Normal patterns
Such patterns must be applied explicitly using the apply_pattern construct
Doing so, it is possible to specify custmization values for user defined template parameters
pattern TA macro AAA "AAA"

apply_pattern TA base=abc
apply_pattern TA base=def
In the apply_pattern syntax, it is even possible to simply ommit the keyword itself, and thus using the pattern name as a plain CMT keyword. The previous example becomes:
TA base=abc
TA base=def
This can be seen as a way to extend the CMT language. Notice that there is a risk of a conflict between the primary CMT keywords and pattern names then. Suppose that a pattern name is defined to be exactly a primary CMT keyword. In this case, the syntax parser will always understand this name as the CMT primary keyword, and thus won't override the original syntax. When this (not recommended) situation occurs, it is therefore required to use the full notation with an explicit apply_pattern keyword, so as to avoid any possible ambiguity.
Global patterns (ie when the -global qualifier is used
In this case, the pattern is automatically applied to all packages that effectively see the pattern definition, which includes all clients of the package defining the pattern.
Another consequence of the automatic application of the pattern, is that it is not possible to give values to parameters. Therefore it is not recommended to design global patterns with user defined parameters.
Conversely it is possible to inhibit the automatic application of a global pattern in a particular package by using the following statement:
These patterns act quite similarly to the global patterns previously described, ie they defines a set of CMT statements to be applied in a generic way. The difference is that instead of being applied to packages , they are automatically applied to all entries in the CMTPATH list.
Only few system parameters can be used here:
which stands for any entry in the CMTPATH list.
which stands for the project name associated with an entry in the CMTPATH list.
this will assemble one -I option (towards the preprocessor) per entry in CMTPATH, implementing a mechanism for a multiple installation area for header files. In the example above the resulting macro will be
Describe the specific directory branches to be added while configuring the package.
branches ...
These branches will be created (if needed) at the same level as the cmt branch. Typical examples of such required branches may be include , test or data .
Users can control the behaviour of CMT through a set of strategy specifications. The current implementation provides such control over several aspects :
The build strategy
This controls some aspects of the building process.
The following keywords are available:
prototypes
C source files will automatically produce a header file containing a prototype of all global entry points
no_prototypes
No production of automatic prototype header files for C sources
with_installarea
The installation area mechanisms are activated. This implies applying the cmtpath_patterns that may be defined (eg in CMT itself)
without_installarea
The installation area mechanisms are inhibited
The setup strategy
This controls various actions that may be performed during the sourcing of the setup scripts.
The following keywords are available:
config
An environment variable CONFIG will be generated for all packages in the dependency chain
no_config
The CONFIG environment variable is not generated
root
An environment variable ROOT will be generated for all packages in the dependency chain
no_root
The ROOT environment variable is not generated
cleanup
The automatic cleanup operation to the current installation area is launched
no_cleanup
The automatic cleanup operation to the current installation area is not launched
The strategy specifications are setup on a per-project basis. This means that they are generally applicable to all packages of a given sub-project, and can be oerridden in other sub-projecs of the same software base.
Every strategy setting defines two mutually exclusive tags and activates one of them.
Specify user defined configuration scripts, which will be activated together with the execution of the main setup and cleanup scripts.
The script names may be specified without any access path specification, in this case, they are looked for in the cmt or mgr branch of the package itself. They may also be specified without any .csh or .sh suffix, the appropriate suffix will be appended accordingly when needed. Therefore, when such a user configuration script is specified, CMT expects that the corresponding shell scripts actually exist in the appropriate directory (the cmt branch by default) and is provided in whatever format is appropriate (thus suffixed by .csh and/or .sh ).
Override the specification for the default include search path, which is internally set to
${<package >_root}/src .
Specifying the value none (a reserved CMT keyword) means that no default include search path is expected from CMT, and thus no -I compiler option will be generated by default (generally this means that user include search paths should be specified via explicit include_dirs instead).
Note that this behaviour is expected to become obsolete in some next release of CMT. The default include search path of ../src will then simply disappear, and the include_path statement will become meaningless. When this happens, include search paths will always have to be explicitly specified using the include_dirs statement. In order to anticipate this evolution, it is suggested to always use include_path none and add all include search directories using the include_dirs statement.
This statement specifies a specialized makefile fragment, used as a building brick to construct the final makefile fragment dedicated to build the constituents.
There are basically three categories of such fragments :
some are provided by CMT itself (they correspond to its internal behaviour)
others handle the language support
and the last serve as specialized document generators.
The fragments defined in CMT can be:
those used to construct the application or library constituents. Their semantic is standardized (they are all associated with a language statement in the CMT requirements file).
c c_library cpp cpp_library lex lex_library fortran fortran_library yacc yacc_library jar jar_header java java_copy java_header check_java cleanup_java
those used internally by CMT as primary building blocks for assembling the makefile. (Generally developers should not see them).
Language fragments should provide two forms, one for the applications (in which case they are named exactly after the language name eg c, cpp, fortran) and the other for the libraries (in which case they have the _library suffix (eg. c_library, cpp_library, fortran_library). A set of language definitions (C, C++, Fortran, Java, Lex, Yacc) is provided by CMT itself but it is expected that projects add new languages according to their needs. Event if the make fragment meant to be the implementation of a language support is declared, the language support itself must be declared too, using the language statement
All make fragments are provided as (suffixless) files which must be located in the fragments sub-directory inside the cmt/mgr branch of one package. They must also be declared in the requirements file (through the make_fragment statement) so as to be visible.
A package declaring, and implementing a make fragment may override a fragment of the same name when it is already declared by a used package. This implies in particular that any package may freely override any make fragment provided by CMT itself (although in this case a deep understanding of what the original fragment does is recommended).
Makefile fragments may take any form convenient to the document style, and some special pre-built templates (see the appendix ) can be used in their body to represent running values, meant to be properly expanded at actual generation time :
The public or private keywords introduce sections containing public or private statements. This concerns:
the definition of symbols
the specification of use relationships
the declaration of make fragments
the declaration of patterns
the declaration of include search paths (via the include_dirs statement)
Public definitions are meant to be exported to any client of the package whereas private ones are only available for the package developper ie. when the current directory is within the package itself.
Public use relationships expose the complete sub-tree to the package clients, whereas private ones entirely hide the sub-tree, expanding it only when the operator really acts from within the context of the package. It should be noticed that private use relationships are completely unvisible from clients, which implies that none of the definitions (not only symbols) will be set.
However, the cmt broadcast and cmt show uses commands are configured to always ignore the private specification and therefore will always traverse the sub-trees whether they are public or private (in order to ensure the hierarchy dependencies)
By using the public or private keywords, one defines scoping sections. This sections continues until:
another scoping statement is found, which simply switch to this new mode
an end_private or end_public keyword is found, in which case the scoping mode is reset to the state prior to the previous matching private or public statement. This latter mechanisms permits in particular to define autonomous scoping sections within pattern s .
By default cmt commands operate according to the scoping specifications found in the requirements files of the reachable packages. Ie. in the current package all statements are considered whether being prublic or private, while in used packages, only public statements are considered.
This standard behaviour though is not applied when running cmt broadcast or cmt show uses , and in this case all statements public or private, are always considered, even in used packages.
However it is always possible to override the default behaviours by using the -private or -public modifier to the cmt command:
-private
Force the command to consider all definitions even those installed in private sections
-public
Force the command to really mask the private sections
The tag keyword provides tag definitions, while the apply_tag keyword activates a tag.
A tag is a token which can be used to select particular values of symbols.
Some tags are automatically constructed by CMT according to its knowledge of the context (see this section for more details), but they may be also defined within a requirements file as follows :
tag Foo                [1]
tag Bar Foo FooA FooB  [2]
apply_tag Bar          [3]
This simply declares a tag. This does not activate it by default
This construct declares that the tags Foo , FooA and FooB will become active if Bar becomes active. Note that this statement implicitly declaresFooA and FooB
This activates the Bar tag. Tags that have been associated with it (in [2]), will all become active as well.
Running the setup script (through the source setup.[c]sh or call setup.bat command ) can also receive tag specifications using the -tag=tag-list options.
This utility (a shell script combined with a C++ application) provides a centralised access to various commands to the CMT system. The first way to use cmt is to run it without argument, this will print a minimal help text showing the basic commands and their syntax :
> cmt command [option...]
command :
none
awk
broadcast [-select=list] [-exclude=list] [-local] [-global] [-begin=pattern] [-depth=n] :
apply a command to [some of] the used packages
build
The following sections present the detail of each available command.
These options of the general form - or - should be provided before the command itself. They give special hints to cmt onto how to perform the command.
Some options have meaning over all commands (such as the -quiet option) while some others only have a meaning in the context of some specialized commands (such as the -with_version_directory option which is only useful for the create or co commands)
The following table describes the various global options of the cmt tool:
option
effect
commands
-quiet
don't print errors
all
-use=
::
set current package version and path in one option
all
-pack=
set current package, version and root path
all
-version=
-path=
-f=
override input file
all
-e=
add a one line statement
all
-tag=
select a new tag-set
all
-tag_add=
add specific comma-separated tag(s)
all
-tag_remove=
remove specific comma-separated tag(s)
all
-warnings
displays various warnings, such as invalid PATH items
This command tries to repeatedly execute a shell command in the context of each of the used package of the current package. The used packages are listed using the cmt show uses command, which also indicates in which order the broadcast is performed. When the all_packages option, the set of packages reached by the broadcast is rather the same as the one shown by the cmt show packages command, ie all CMT packages and versions available through the current CMTPATH list.
Typical uses of this broadcast operation could be:
The loop over used packages will stop at the first error occurence in the application of the command, except if the command was preceded by a '-' (minus) sign (similarly to the make convention).
It is possible to specify a list of selection or exclusion criteria set onto the package path, using the following options, right after the broadcast keyword. These selection criteria may be combined (eg one may combine the begin and select modifiers)
According to the option, the loop will only operate onto:
the first package which path contains the string "Cm" , and then all other reachable packages (in case other specifiers are used)
the packages which path contains the string "Cm"
the packages which path contains either the string "/Cm/" or the string "/CSet/"
the packages which path contains the string "Cm" , but which does not contain the string "Cmo"
the packages at the same level as the current package
the packages at the same level as the current package or among the first entries in the CMTPATH list
the packages at any level of the CMTPATH search list
all the packages and versions currently available through the CMTPATH list
The environment variables as specified in the requirements files of the use graph are internally pre-set before running the specified shell command. Thus it's not required to source the setup scripts before using the broadcast command
A priori any Unix or DOS shell command can be specified in a boadcast command. However, it's important to understand the order of the various parsing actions:
The current shell first parses the complete command line
CMT catches all possible options given to the broadcast command itself
CMT then gets the rest of the command line and makes it the shell command to be executed during the broadcast scan.
This command line may be subject to template substitution (see below) by CMT
Eventually the command line is passed to the local shell (which may then perform additional parsing actions)
Considering this complex sequence of parsing, it may be appropriate to selectively enclose the shell command passed to the broadcast action into quotes. It may even be sometimes useful to have two levels of quotes
Similarly to what exists in the pattern mechanism, some standard templated values can be embedded inside the command to be executed by the broadcast action. They take a standard form of . These templates acquire their value on each package effectively reached during the broadcast scan, and the effective value is substituted before launching the command. The possible templates are:
The element in the CMTPATH search list where the package has been found
The directory offset to cmtpath
The package name
The version of the package
The next example shows a typical broadcast command listing the header files as expected in the conventional location ../ :
> cmt broadcast 'ls ../'
[...]
#--------------------------------------------------------------
# Now trying [ ls ../GenzModuleEvent] in /.../GenzModuleEvent/.../cmt (149/609)
#--------------------------------------------------------------
CVS  KineHepMcmap.h
#--------------------------------------------------------------
# Now trying [ ls ../Tauola_i] in /.../Tauola_i/.../cmt (150/609)
#--------------------------------------------------------------
CVS     Jaki.icc        Tauola_i.h    Taurad.h    config.h    rn_tau.h
Jaki.h  ReadPDGtable.h  Tauola_i.icc  Taurad.icc  polhep.inc  tauola_cblk.inc
#--------------------------------------------------------------
# Now trying [ ls ../NavigationEvent] in /.../NavigationEvent/.../cmt (151/609)
#--------------------------------------------------------------
CVS  INavigable.h  INavigationCondition.h  INavigationSelector.h
INavigationToken.h  NavigationToken.h
[...]
One should note that when templates are used in a broadcast command, it's important to enclose the command in quotes so as to inhibit any possible parsing of the <> syntax by the shell.
The actions associated with the build options are generally meant for internal use only, and users will rarely (if ever!) apply them manually
All build commands are generally meant to change the current package (some file or set of files is generated). Therefore a check against conflicting locks (ie. a lock owned by another user) is performed by all these commands prior to execute it.
[-nmake] constituent_makefile <constituent-name >
This command is internally used by CMT in the standard Makefile.header fragment. It generates a specific makefile fragment (named <constituent-name >.make) which is used to re-build this fragment.
All such constituent fragments are automatically included from the main Makefile.
Although this command is meant to be used internally (and transparently) by CMT when the make command is run, a developer may find useful in very rare cases to manually re-generate the constituent fragment, using this command.
The -nmake option (which must precede the command) provides exactly the same features but in a Windows/nmake context. In this case, all generated makefiles are suffixed by .nmake instead of .make for Unix environments. The main makefile is expected to be named NMake and the standard header is named NMakefile.header
[-nmake] constituents_makefile
This command is internally (and transparently) used by CMT in the standard Makefile.header fragment, and when the make command is run, to generate a specialized make fragment containing all "cmt build constituent_makefile" commands for a given package.
The -nmake option (which must precede the command) provides exactly the same feature but in a Windows/nmake context. In this case, all generated makefiles are suffixed by .nmake instead of .make for Unix environments. The main makefile is expected to be named NMake and the standard header is named NMakefile.header
dependencies
This command is internally (and transparently) used by CMT from the constituent specific fragment, and when the make command is run, to generate a fragment containing the dependencies required by a source file.
This fragment contains a set of macro definitions (one per constituent source file), each containing the set of found dependencies.
CMT is able to recursively compute the dependencies implied by the include statements found in the source files. However it's also possible to make plain use of the standard mechanisms provided by some standard tools like cpp -M . In this case, it will be required to format the output produced by the selected tool so as to let CMT parse it and properly deduce the dependencies. Formatting the output of external tools may require to interface the tool itself e.g. using a shell script.
The standard CMT macro $(build_dependencies) must be used to specify an alternate dependency builder. The default value is:
$(cmtexe) -quiet -tag=$(tags) build dependencies
The expected output format from any dependency builder is as follows:
Each file corresponds to one single dependency line in the output
A dependency line should be formatted as follows:
__dependencies = ...
Where:
is given without the file suffix
is given without the dot
is the path to the source file
the list of paths corresponds to the effective list of dependent files. This is a list of reative or absolute file paths.
A Unix shell script in ${CMTROOT}/mgr/cmt_build_deps.sh is offered as an example of how to interface the standard cpp -M command with CMT. It can be declared as a substitute to the internal mechanism as follows:
Of course this shell script should be considered as an example and might have to be adapted for other dependency builders, or for Windows.
library_links
This command builds a local symbolic link towards all exported libraries from the used packages. A package exports its libraries through the <package >_libraries macro which should contain the list of constituent names corresponding to libraries that must be exported.
The corresponding cmt remove library_links command will remove all these links.
msdev
This command generates workspace (.dsw) and project (.dsp) files required for the MSDev tool.
vsnet
This command generates workspace and project files required for the Visual.net tool.
os9_makefile
This command generates external dedicated makefile fragments for each individual component of the package (ie. libraries or executable applications) to be used in OS9 context. It generates specific syntaxes for the OS9 operating systems.
The output of this tool is a set of files (named with the components' name and suffixed by .os9make ) that are meant to be included within the main Makefile that the developer has to write anyhow.
The syntax of the cmt build os9_makefile utility is as follows :
sh> cmt build os9_makefile
prototype
This command is internally (and transparently) used by CMT from the constituent specific fragment, and when the make command is run, to generate prototype header files from C source files.
The prototype header files (named .ph) will contain prototype definitions for every global entry point defined in the corresponding C source file.
The effective activation of this feature is controled by the build strategy of CMT . The build strategy may be freely and globally overridden from any ?requirements? file, using the build_strategy cmt statement, providing either the "prototypes" or the "no_prototypes" values.
In addition, any constituent may locally override this strategy using the "-prototypes" or "-no_prototypes" modifiers.
readme
This command generates a README.html file into the cmt branch of the referenced package. This html file will include
a table containing URLs to equivalent pages for all used packages,
a copy of the local README file (if it exists).
tag_makefile
This command produces onto the standard output, the exhaustive list of all macros controled by CMT , ie. those defined in the requirements files as well as the standard macros internally built by CMT , taking into account all used packages.
This command reads the hierarchy of requirements files referenced by a package, check them, and signals syntax errors, version conflicts or other configuration problems.
This command generates (to the standard output) a set of shell commands (either for csh or sh shell families) meant to unset all environment variables specified in the ?requirements? files of the used packages.
This command is internally used in the cleanup.[c]sh shell script, itself generated by the cmt config command.
This command (re-)generates the setup scripts and the manimal Makefile (when it does not exist yet or have been lost).
csh> cd ~/Packages/Foo/v1/cmt
csh> cmt config
To be properly operated, one must already be in the cmt or mgr branch of a package (where the ?requirements? file can be found).
This command also performs some cleanup operations (eg. removing all makefile fragments previously generated). Generally speaking, one may say that this command restores the CMT-related files to their original state (ie before any document generation)
The situations in which it is useful to run this command are:
When the setup or cleanup scripts have been lost
When the minimal Makefile have been lost
When the version of CMT is changed
After restoring a package from CVS
After having manually changed the directory structure of a package (using a manual copy operation, or renaming one of its parent directory, such as the version directory)
It should be noted however that when using actions , such as the one defined by default to launch make tools neither cmt config nor source setup are required any longer.
This command produces on the standard output an expansion of the model string given in the argument.
The expansion consists in:
Expanding macros referenced in the model string using the standard notations $() or ${} or %%
> cmt expand model "abcd $(CMTVERSION) efgh"
abcd v1r18p20051101 efgh
Recursively expanding text files with parameters. The model string must then take a conventional XML-based syntax:
> cmt expand model "text <file-nameparameter=value ... /> text ..."
or
> cmt expand model -strict "textfile-name parameter='value' ... /> text ..."
or
> cmt expand model -strict "textfile-name parameter='v1 v2 v3 ...' ... /> text ..."
Where:
file-name is the name of a file declared using the make_fragment statement
parameter =value specifies the value of a parameter that will be substituted in the file when referenced using the $(parameter ) notation. Several such values may be specified in one model string
the -strict form is useful to handle XML files, and file names must be prefixed (namespaced ) by a special keyword cmts: or cmtv: .
cmts:
Perform a unique substitution over one copy of the file
cmtv:
Perform a multiple substitution over N copies of the file, taking the N space-separated values specified for the parameters
The following examples will explain some of the mechanisms.
A simple expansion using the non-strict model syntax. P1 is substituted, but $(P2) becomes empty
The same using the strict model. Here P2 is valued.
A more complex model, using a recursive expansion described in B showing how parameter values are transmitted
A model showing the multiple expansion. Here P1 receives 3 values. P2 has only one value. The largest vector (3 values) dictates the number of copies. smaller vectors are completed by empty values.
A model showing the multiple expansion with empty values in a vector. Here P1 receives 3 values. P2 has also 3 values, but only one non-empty. This examples show the two possible means of specifying empty vector values: using either \"\" or the reserved keyword .
The file expansion is recursive. This means that files specified in model elements will themselves be considered as model texts (ie following the same syntax), and be expanded in turn. This processus is entirely recursive, with no limit to the depth. The -strict option, when selected is propagated during the recursion.
This command reads , substitutes all occurences of macro references (taking either the form $(macro-name ) or ${macro-name } ) by values deduced from corresponding macro specifications found in the ?requirements? files, and writes the result into .
This mechanism is widely internally used by CMT , especially for instanciating make fragments. Then, users may use it for any kind of document, including maual generation of MSDev configuration files, etc...
This command tries to set a lock onto the current package (or onto the specified package). This consists in the following operations:
Check if a conflicting lock is already set onto this package (ie. a lock owned by another user).
If not, then install a small text file named lock.cmt into the cmt/mgr branch of the package, containing the following text:
locked by date
Run a shell command described in the macro named lock_command meant to install physical locks onto all files for this version of this package. A typical definition for this macro could be:
This command removes one version of the specified package. If the package does not contain a conflicting lock, and if the user is granted enough access rights to remove files, all files below the version directory will be definitively removed. Therefore this command should be used with as much care as possible.
The arguments needed to reach the package version to be removed are the same as the ones whic had been used to create it.
If the removed version is the last version of this package, (and only if its directory is really empty) the package directory itself will be deleted.
This command removes symbolic links towards all imported libraries which had been installed using the cmt build library_links command. This command is generally transparently executed when one runs gmake clean
This command runs any shell command, in the context of the current package.
In particular all environment variables defined in requirements file are first set before running the command. This may be seen as a generic application launcher .
This may be combined with the global options -pack=package , -version=version , -path=access-path , to give a direct access to any package context.
This command applies recursively the cmt set version ... command onto all used packages using a broadcast operation.
Packages reached during the broadcast scan acquire their version from the original use statement. This is this specified version which will be stored inside the version.cmt files
This command generates (to the standard output) a set of shell commands (either for csh, sh or bat shell families) meant to set all environment variables specified in the requirements files of the used packages.
This command is internally used in the setup.[c]sh or setup.bat shell script, itself generated by the cmt config command.
This command displays all currently defined tags, even when not currenty active
applied_patterns
This command displays all patterns actually applied in the current package
author
branches
clients [ ]
This command displays all packages that express an explicit use statement onto the specified package. If no version is specified on the argument list, then all uses of that package are displayed.
Note that the search on clients is not performed recusively. Thus only clients explicitly using the specified package will be displayed.
constituent_names
constituents
cycles
This command displays all cycles in the use graph of the current package. Although CMT smoothly accepts such cycles, it is generally a bad practice to have cycles in a use graph, because CMT can never decide on the prefered entry point in the cycle, leading to somewhat unpredictable results, eg in constructing the use_linkopts macro.
fragment
This command displays the actual location where the specified make fragment is currently found by CMT , taking into account possible overridden definitions.
fragments
Display the effective location of all declared make fragments
groups
This command displays all groups possibly defined in constituents of the current package (using the -group=<group-name > option).
languages
Display al languages declared using the language keyword
macro
set
action
This set of commands displays a quite detailed explanation on the value assigned to the symbol (macro, set or action) specified as the additional argument. It presents in particular each intermediate assignments made to this symbol by the hierarchy of used statements, as well as the final result of these assignment operations.
By adding a -tag= option to this command, it is possible to simulate the behaviour of this command in another context, without actually going to a machine or an operating system where this configuration is defined.
macro_value
set_value
action_value
This set of commands displays the raw value assigned to the symbol (macro, set or action) specified as the additional argument. It only presents the final result of the assignment operations performed by used packages.
By adding a -tag= option to this command, it is possible to simulate the behaviour of this command in another context, without actually going to a machine or an operating system where this configuration is defined.
The typical usage of the show macro_value command is to get at the shell level (rather than within a Makefile ) the value of a macro definition, providing means of accessing them (quite similarly to an environment variable) :
csh> set compiler=`cmt show macro_value cppcomp`
csh> ${compiler} ....
macros
sets
actions
This set of commands extracts from the ?requirements? file(s) the complete set of symbol (macro, set or action) definitions, selects the appropriate tag definition (or uses the one provided in the -tag= option) and displays the effective symbol values corresponding to this tag.
This command is typically used to show the effective list of macros used when running make and can be also used to build, as an argument list, the make command as follows :
csh> eval make `cmt show macros`
This use of cmt show macros is directly installed within the default target provided in the standard Makefile.header file. Therefore if this file is included into the package's Makefile , macro definitions provided in the ?requirements? files (the one of the currently built package as well as the ones of the used packages) will be expanded and provided as arguments to make.
By adding a -tag= option to this command, it is possible to simulate the behaviour of this command in another context, without atcually going to a machine or an operating system where this configuration is defined.
manager
packages
This command displays all packages (and all versions of them) currently reachable through the current access path definition (which can be displayed using the cmt show path command).
path
This command displays the complete and effective access path currently defined using any possible alternate way.
pattern
This command displays how and where the specified pattern is defined, and which packages do apply it.
patterns
This command displays all pattern definitions.
projects
This command displays the current knowledge of sub-project definitions and settings. It shows the project names and their location (ie the corresponding item in CMTPATH
> cmt show projects
PA (in C:\Arnault\test\tprojects\PC) (current)
Project1 (in C:\Arnault\test\tprojects\PB)
PA (in C:\Arnault\test\tprojects\PA\1.1)
Project2 (in C:\Arnault\test\tprojects\P0)
CMT (in C:\Arnault)
pwd
This command displays a filtered version of the standard pwd unix command. The applied filter takes into account the set of aliases installed in the standard configuration file located in ${CMTROOT}/mgr/cmt_mount_filter .
This configuration file contains a set of path aliases (one per line) each proposing a translation for non-portable file paths (imposed by mount constraints on some contexts).
setup
This command combines in one go the output of:
> cmt show uses
> cmt show tags
> cmt show path
strategies
tags
This command displays all currently active tags, and what part of the configuration actually activates them
uses
This command displays the use graph fo the current package. Private sections of used packages are reached and considered. This behavior can be changed to effectively hide the private sections in used packages by using the -public modifier
> cmt -public show uses
A typical output produced by this command is:
> cmt show uses
# use GaudiPolicy v*                             [1]
# use GaudiKernel v*
#   use GaudiPolicy v5r*                         [2]
# use CLHEP v*  (native_version=1.8.2.0)         [3]
#   use ExternalLibs v4r*
#
# Selection :                                    [4]
use CMT v1r18p20051101 (/afs/cern.ch/sw/contrib)
use ExternalLibs v4r2p0  (/afs/cern.ch/atlas/offline/external/Gaudi/0.12.1.5)    [5]
use CLHEP v2r1820p0  (/afs/cern.ch/atlas/offline/external/Gaudi/0.12.1.5)
use GaudiPolicy v5r11p2  (/afs/cern.ch/atlas/offline/external/Gaudi/0.12.1.5)
use GaudiKernel v13r5p1  (/afs/cern.ch/atlas/offline/external/Gaudi/0.12.1.5)
The first section of the display (up to the Selection keyword) displays the hierarchical use graph.
Use statements as specified in the requirements files are displayed, rather than the result of the effective selection performed by CMT
Sub-uses are expanded only once and indented according to the depth in the graph
Various precisions on the use statements are shown in the first section, such as the scoping section, the -no_auto_imports modifier, and the native version of this package, (when a _native_version macro has been defined)
The second section shows the effective ordered set of use statements resolved by CMT according to the combined use specifications.
On every line the effective location of the found package is displayed.
The -quiet option may be used to remove the first section from the output so as to only display a simple list of used packages, starting from the deepest uses.
use_paths
This command displays all possible paths between the current package and the specified used target package.
In particular this will detect if a package has no access to another one, due to private use statements
version
This command displays the version tag of the current package.
versions
This command displays the reachable versions of the specified package, looking at the current access paths.
This command tries to remove a lock from the current package (or from the specified package). This consists in the following operations:
Check if a conflicting lock is already set onto this package (ie. a lock owned by another user).
If not, then remove the text file named lock.cmt from the cmt/mgr branch of the package.
Run a shell command described in the macro named unlock_command meant to remove physical locks from all files for this version of this package. A typical definition for this macro could be:
This command shows the current verion of CMT , including (if applicable) the actual patch level. This always corresponds to the corresponding CVS tag assigned to CMT sources.
The main sections installed within a setup script are :
Connection to the current version of the CMT package.
Setting the set of user defined public variables specified in the ?requirements? file (including those defined by all used packages). This is achieved by running the cmt setup utility into a temporary file and running this temporary file.
Activation of the user defined setup and cleanup scripts (those specified using the setup_script and cleanup_script statements).
It should be noted that these setup scripts do not contain machine specific information (due to the online use of the cmt setup command). Therefore, it is perfectly possible to use the same setup script on various platforms (as soon as they share the directories) and this also shows that the configuration operation (the cmt config command) is required only once for a set of multiple platforms sharing a development area.
This command is only provided for development of C modules. It generates a C header file containing the set of prototype statements for all public functions of a given module. Its output is a file with the same name as the input source (given as the argument) and suffixed with .ph .
The generated prototype header file is meant to be included whereever it is needed (in the module file itself for instance).
A typical example of the use of cmt build prototype could be :
csh> cd ../src
csh> cmt build prototype FooA.c
Building FooA.ph
Running cmt build prototype will only produce a new prototype header file if the output is actually different from the existing one (if it exists) in order to avoid confusing make checks.
The effective use of this facility (which may not be appropriate in all projects) is controlled by one option of the build strategy, which can take one of the two values:
In addition to this global strategy specification, each application or library may individually override it using the -prototypes or -no_prototypes options.
Lastly, the actual behaviour of the prototype generator is defined in the standard make macro build_prototype (which default to call the cmt build prototype command, allowing a user defined behavious to this feature)
Nothing special is apriori required by CMT with respect to the use of CVS . Nevertheless, one may advertize some well tested conventions and practices which turned out to ensure a good level of consistency between the two utilities.
Although none of these are required, the cmt general command provides a few utilities so as to simplify the use of these practices. It should be noted that the added features provided by cmt rely on the possibility to query CVS about the existing CMT packages and the possible tags setup for these packages. CVS does not by default permit such query operations (since they require to scan the physical CVS repository). Therefore CMT provides a hook to CVS (based upon standard CVS features - not patches) for this. This hook can be installed following a recipe explained in the dedicated appendix .
Generally, everything composing a package (below the version directory and besides the binary directories) is relevant to be imported. Then choosing a cvsmodule name is generally done on the basis of the package name. Taking the previous examples, one could import the Foo package as follows :
we have ignored the currently existing binary directories (here alpha and hp9000s700 )
the cvs module name is identical to the package name (Foo )
the original symbolic insertion tag is identical to the version identifier (v1 )
The choice of the module name can generally be identical to the package name. However, some site specific management issues may lead to different choices (typically, a top directory where groups of packages are gathered may be inserted).
Conversely, using symbolic tags identical to version identifiers appears to be a very good practice. The only constraint induced by cvs is that the symbolic tags may not contain dot characters ('.' ), whereas no restriction exist from CMT itself. Thus version identifiers like v3r2 will be preferred to the v3.2 form.
14.?2 - Checking a package out from a cvs repository
Assuming the previous conventions on module name and version identifier have been selected when importing a package, the following operations will naturally intervene when one need to check a package out (typically to work on it or to install it on some platform) :
one always have to select a root directory where to settle down this copy of the extracted package. This may either be the so-called default root or any other appropriate directory. In both cases, the next cmt config operation will automatically take care of this effective location.
creating a base directory with the package name is mandatory here, and is not taken into account by cvs during the chaeckout operation since one wants to insert the version branch in between.
the package is checked out into a directory named with the expected version identifier exactly corresponding to the version currently stored in the cvs repository.
then using the cmt config command (from the cmt branch) will update the setup scripts against the requirements file and the effective current package location.
using this updated version of the setup script provides the appropriate set of environment variables
lastly, rebuilding the entire package is possible simply using the [g]make command.
The actions decribed just above (from number 2 to number 4 included) can also be performed using the cmt checkout command.
> cd
> cmt checkout [modifier ...]  ...

modifier :
-l        Do not process used packages (default).
-R        Process used packages recursively.
-r rev    Check out version tag. (is sticky)
-d dir    Check out into dir instead of module name.
-o offset Offset in the CVS repository
-n        Simulation mode on
-v        Verbose mode on
-help     Print this help
Thus the previous example would become:
csh> cd
csh> cmt checkout Foo
csh> cd Foo/v1/cmt
csh> source setup.csh
csh> [g]make
to query the CVS repository about the existing tags installed onto a given CVS module, the subdirectories and the subpackages (in the CMT meaning, i.e. when a requirements file exists).
> cmt cvstags Cm
v7r6 v7r5 v7r4 v7r3 v7r1 v7
> cmt cvstags Co
v3r7 v3r6 v3
One should notice here that the cvstags command can give informations about any type of module, even if it is not managed in the CMT environment.
However, in order to let this mechanism operate, it is required to install some elements into the physical CVS repository ( which may require some access rights into it ). This installation procedure (to be done only once in the life of the repositiory) can be achieved through the following command:
sh> (cd ${CMTROOT}/mgr; gmake installcvs)
However, the details of the procedure is listed below (this section is preferably reserved for system managers and can easily be skipped by standard users):
copy the cmt_buildcvsinfos2.sh shell script into the management directory ${CVSROOT}/CVSROOT as follows :
install one special statement in the loginfo administrative file as follows :
sh> cd ...
sh> cvs checkout CVSROOT
sh> cd CVSROOT
sh> vi loginfo
...
.cmtcvsinfos $CVSROOT/CVSROOT/cmt_buildcvsinfos2.sh
sh> cvs commit -m "set up commitinfo for CMT"
14.?4 - Working on a package, creating a new release
This section presents the way to instanciate a new release of a given package, which happens when the foreseen modifications will yield additions or changes to the application programming interface of the package.
Then the version tag is supposed to be moved forward, either increasing its minor identifier (in case of simple additions) or its major identifier (in case of changes).
The following actions should be undertaken then :
understand what is the latest version tag (typically by using the cmt cvstags command). Let's call it old-tag .
select (according to the foreseen amount of changes) what will be the next version tag. Let's call it new-tag .
check the most recent version of the package in your development area :
14.?5 - Getting a particular tagged version out of CVS
The previous example presented the standard case where one gets the most recent version of a given package. The procedure is only slightly modified when one wants to extract a previously tagged version. Let's imagine that the Foo package has evolved by several iterations, leading to several tagged releases in the cvs repository (say v2 and v3 ). If the v2 release is to be used (e.g. for understanding and fixing a problem discovered in the running version) one will operate as follows :
csh> cd
csh> mkdir Foo
csh> cd Foo
csh> cvs checkout -d v2 -r v2 Foo
csh> cd v2/cmt
csh> cmt config
csh> source setup.csh
csh> make
Very often, external packages (typically commercial products, or third party software) are to be used by packages developped in the context of the CMT environment. Although this can obviously done simply by specifying compiler or linker options internally to the client packages, it can be quite powerful to interface these so-called external packages to CMT by defining a glue package, where configuration specifications for this external package are detailed.
Using this approach, one may :
provide a nickname for this external package,
adapt the version tag convention consistently to the project, hiding the version tag specificities of eg. commercial packages.
provide compiler options using the the standard make macros _cflags , _cppflags or _fflags ,
specify a set of search paths for the include files, using the include_dirs statement,
provide linker options using the the standard make macros _linkopts
Let's consider the example of the OPACS package. This package is provided outside of the CMT environment. Providing a directory tree following the CMT conventions (ie. a branch named after the version identifier, then an cmt branch) then a ?requirements? file, containing (among other statements not shown for the sake of clarity) :
Then every package or application, client of this OPACS package would have just to provide a use statement like :
use OPACS v3
This procedure gives the complete benefit of the use relationships between packages (a client application transparently inherits all configuration specifications) while keeping unchanged the original referenced package, allowing to apply this approach even to commercial products so that they may be integrated in resource usage surveys similarly to local packages.
CMT proposes and implements a flexible architecture for installation areas, meant to group the results of the build process or any other information belonging to packages into shared disk spaces. The typical usage of such installation areas is classical and expect to make only visible to the clients of a given (sub-)project the results of the build process while hiding the details of the package sources.
the basics of the mechanisms supported by CMT are the following:
The installation area mechanism is activated on demand via a dedicated strategy specification, that can be written either in a requirements file or in a project file. By default the mechanism is not active.
All mechanisms are customizable on a per-project basis, so as to easily follow the project specific conventions
However CMT proposes a minimal default behaviour based on the concrete experience in large projects, as well as frequently met practices
A typical well supported convention is to map the set of installation areas onto the set of CMTPATH entries, associating the concept of CMTPATH splitting with the sub-project organization
A typical consequence of this approach is that many configuration parameters need to be set according to the list of CMTPATH items. Eg on a Unix system, if one expects to find shared libraries in every installation area, each of them being created in a corresponding CMTPATH entry, one also expects to have LD_LIBRARY_PATH entries accordingly. The mechanism of cmtpath_pattern is exactly designed for that.
The mechanism easily supports the extension for installing binary files (libraries, applications, java classes), runtime files, documentation and header files.
The _installarea_prefix takes the default value of $(cmt_installarea_prefix) for all projects, which itself takes the default value of InstallArea . Of course it can be overridden to other values in each project
The cmtpath_patterns are designed in this implementation for constructing a proper and consistent sequence of system specific environment variables (eg PATH , LD_LIBRARY_PATH , CLASSPATH ) as well as compiler or linker options so as to transparently refer to the installation area only when it is appropriate to ovverride the local patterns.
First of all every individual sub-project may activate or inhibit the installation area mechanisms using the build_strategy statement, with either with_installarea or without_installarea option.
Then a dedicated tag materializes the selected strategy: _with_installarea or _without_installarea
This tag set will be used in various macro or set definitions to produce or not the appropriate values
CMT manipulate some standard macros or environment variables according to the effective strategy:
name
purpose
default
cmt_installarea_prefix
The default prefix for all projects
InstallArea
_installarea_prefix
The prefix for a given sub-project
$(cmt_installarea_prefix)
_installarea_prefix_remove
The regexp pattern to cleanup symbols
$(_installarea_prefix)
cmt_installarea_linkopts
Implicit linker options due to the installation area
...
PATH
Accessing the executables in the installation area
...
LD_LIBRARY_PATH
Accessing the shared libraries in the installation area
These sections are of interest only if CMT is not yet installed on your site, of if you need a private installation.
The first question you need to answer is the location where to install CMT . This location is typically a disk area where most of packages managed in your project will be located.
Then, you have to fetch the distribution kit from the Web at https://cmtsite.org . You must get at least the primary distribution kit containing the basic configuration information and the CMT sources. This operation results in a set of directories hanging below the CMT root and the version directory. The src branch contains the sources of CMT , the fragments branch contains the makefile fragments and the mgr branch contains the scripts needed to build or operate CMT .
The very first operation after dowloading CMT consists in running the INSTALL shell script. This will build the setup scripts required by any CMT user.
Then you may either decide to build CMT by yourself or fetch a pre-built binary from the same Web location. The prebuilt binary versions may not exist for the actual platform you are working on. You will see on the distribution page the precise configurations used for building those binaries.
In case you have to build CMT yourself, you need a C++ compiler capable of handling templates (although the support for STL is not required). There is a Makefile provided in the distribution kit which takes g++ by default as the compiler. If you need a specific C++ compiler you will override the cpp macro as follows:
sh> gmake cpp=CC
The cppflags macro can also be used to override the behaviour of the compilation.
Another important concern is the way CMT will identify the platform. CMT builds a configuration tag per each type of platform, and uses this tag for naming the directory where all binary files will be stored. As such this tag has to be defined prior to even build CMT itself.
CMT builds the default configuration by running the cmt_system.sh script found in the mgr branch of CMT . Run it manually to see what is the default value provided by this script. You might consider changing its algorithm for your own convenience.
A distribution kit may be obtained at the following URL :
https://cmtsite.org
Once the tar file has been downloaded, the following operations must be achieved :
Select a root directory where to install CMT . Typically this will correspond to a development area or a public distribution area.
Import the distribution kit mentioned above.
Uncompress and untar it.
Configure CMT .
CMT is ready to be used for developing packages.
A typical corresponding session could look like :
csh> cd /Packages
csh>
csh> tar xzf CMTv1r18p20051101.tar.gz
csh> cd CMT/v1r18p20051101/mgr
csh> ./INSTALL
csh> source setup.csh
csh> gmake
17.?2 - Installing CMT on a Windows or Windows NT site
You first have to fetch the distribution kit from the Web at https://cmtsite.org . You must get at least the primary distribution kit containing the basic configuration information and the CMT sources. This operation results in a set of directories hanging below the CMT root and the version directory. The binary kit provided for Windows environments will generally fit your needs.
You should consider getting the pre-compiled (for a Windows environment) applications, and especially the ..\VisualC\install.exe application, which interactively configures the registry entries as described in the next paragraph.
The next operation consists in defining a few registries (typically using the standard RegEdit facility or the install.exe special application):
HKEY_LOCAL_MACHINE/Software/CMT/root will contain the root directory where CMT is installed (eg. "e:" ).
HKEY_LOCAL_MACHINE/Software/CMT/version will contain the current version tag of CMT ("v1r18p20051101" for this version).
HKEY_LOCAL_MACHINE/Software/CMT/path/ may optionally contain a set of text values corresponding to the different package global access paths.
HKEY_LOCAL_MACHINE/Software/CMT/site will contain the conventional site name.
HKEY_CURRENT_USER/Software/CMT/path/ may contain a set of text of text values corresponding to the different package private access paths.
CMT can also be configured to run on DOS-based environments using the nmake facility. In this case, the installation procedure is very similar to the Unix one:
A typical corresponding session could look like :
dos> cd Packages
dos>
dos> cd CMT\v1r18p20051101\mgr
dos> call INSTALL
dos> call setup.bat
dos> nmake /f nmake
Copyright LAL and Christian Arnault LAL-Orsay CNRS
This software is a computer program whose purpose is to describe and manage software configuration activities.
This software is governed by the CeCILL license under French law and abiding by the rules of distribution of free software. You can use, modify and/ or redistribute the software under the terms of the CeCILL license as circulated by CEA, CNRS and INRIA at the following URL
http://www.cecill.info
As a counterpart to the access to the source code and rights to copy, modify and redistribute granted by the license, users are provided only with a limited warranty and the software's author, the holder of the economic rights, and the successive licensors have only limited liability.
In this respect, the user's attention is drawn to the risks associated with loading, using, modifying and/or developing or reproducing the software by the user in light of its specific status of free software, that may mean that it is complicated to manipulate, and that also therefore means that it is reserved for developers and experienced professionals having in-depth computer knowledge. Users are therefore encouraged to load and test the software's suitability as regards their requirements in conditions enabling the security of their systems and/or data to be ensured and, more generally, to use and operate it in the same conditions as regards security.
The fact that you are presently reading this means that you have had knowledge of the CeCILL license and that you accept its terms.
These macros describe the structural conventions followed by CMT . They receive a conventional default value from the CMT requirements file. However, they can be overridden in any package for its own needs.
These macros are purely conventional. They are expected in the various make fragments available from CMT itself for providing the various building actions.
During the mechanism of new language declaration and definition available in the CMT syntax, developers are expected to define similar conventions for corresponding actions.
Their default values are originally defined inside the ?requirements? file of the CMT package itself but can be redefined by providing a new definition in the package's requirements file using the macro statement. The original definition can be completed using the macro_append or macro_prepend statements.
These macros do not receive default values. They are all prefixed by the package name. They are meant to provide specific variant to the corresponding generic language related macros.
They are automatically and by default concatenated by CMT to fill in the corresponding global use macros (see appendix on generated macros ). However, this concatenation mechanism is discarded when the -no_auto_imports option is specified in the corresponding use statement.
macro
usage
<package >_cflags
specific C flags
<package >_pp_cflags
specific C preprocessor flags
<package >_cppflags
specific C++ flags
<package >_pp_cppflags
specific C++ preprocessor flags
<package >_fflags
specific Fortran flags
<package >_pp_fflags
specific Fortran preprocessor flags
<package >_libraries
gives the (space separated) list of library names exported by this package. This list is typically used in the cmt build library_links command.
<package >_linkopts
provide the linker options required by any application willing to access the different libraries offered by the package. This may include support for several libraries per package.
A typical example of how to define such a macro could be :
may contain a list of stamp file names (or make targets). Whenever a library is modified, one dedicated stamp file is re-created, simply to mark the reconstruction date. The name of this stamp file is conventionally <library >.stamp . Thus, a typical definition for this macro could be :
macro Cm_stamps "$(Cm_root)/$(Cm_tag)/Cm.stamp"
Then, these stamp file references are accumulated into the standard macro named use_stamps which is always installed within the dependency list for applications, so that whenever one of the libraries used from the hierarchy of used packages changes, the application will be automatically rebuilt.
The following macros are not subject to automatic concatenation (and therefore are not hidden by the -no_auto_imports modifier).
macro
usage
<package >_native_version
specifies the native version of the external package referenced by this interface package.
When this macro is provided, its value is displayed by the cmt show uses command
<package >_export_paths
specifies the list of files or directories that should be exported during the deployment process for this package. Generally this is only useful for glue packages refering to external software
<package >_home
specifies the base location for external software described in glue packages. This macro is generally used to specify the previous one
18.?3.?5 - Constituent specific customizing macros
These macros do not receive any default values (ie they are empty by default). They are meant to provide for each constituent, specific variants to the corresponding generic language related macros.
By convention, they are all prefixed by the constituent name. But macros used for defining compiler options are in addition prefixed by the constituent type (either lib_ , app_ or doc_ ).
They are used in the various make fragments for fine customization of the build command parameters.
<type >_<constituent >_cflags
specific C flags
<type >_<constituent >_pp_cflags
specific C preprocessor flags
<type >_<constituent >_cppflags
specific C++ flags
<type >_<constituent >_pp_cppflags
specific C++ preprocessor flags
<type >_<constituent >_fflags
specific Fortran flags
<type >_<constituent >_pp_fflags
specific Fortran preprocessor flags
<constituent >linkopts
provides additional linker options to the application. It is complementary to - and should not be confused with - the <package >_linkopts macro, which provides exported linker options required by clients packages to use the package libraries.
<constituent >_shlibflags
provides additional linker options used when building a shared library. Generally, a simple shared library does not need any external reference to be resolved at build time (it is in this case supposed to get its unresolved references from other shared libraries). However, (typically when one builds a dynamic loading capable component) it might be desired to statically link it with other libraries (making them somewhat private).
<constituent >_dependencies
provides user defined dependency specifications for each constituent. The typical use of this macro is fill it with the name of the list of some other constituents which have to be rebuilt first (since each constituent is associated with a target with the same name). This is especially needed when one want to use the parallel gmake (ie. the -j option of gmake).
<group >_dependencies
provides user defined dependency specifications for each group. The typical use of this macro is fill it with the name of the list of some other constituents which have to be rebuilt first (since each constituent is associated with a target with the same name). This is especially needed when one want to use the parallel gmake (ie. the -j option of gmake).
These macros do not receive any default values (ie they are empty by default). They are meant to provide for each source file, specific variants to the corresponding generic language related macros.
By convention, they are all prefixed by the source file name followed by the source file suffix (either _c , _cxx , _f , etc.)
They are used in the various make fragments for fine customization of the build command parameters.
These macros are automatically generated when any cmt connand is run (and thus when make is run).
The first set of them provide constant values corresponding to CMT based information. They are not meant to be overridden by the user, since they serve as a communication mean between CMT and the user.
<PACKAGE >ROOT
The access path of the package (including the version branch). This is controlled by the setup_strategy [no_]root statement.
<package >_root
The access path of the package (including the version branch). This macro is very similar to the <PACKAGE >ROOT macro except that it tries to use a relative path instead of an absolute one.
<PACKAGE >VERSION
The used version of the package.
PACKAGE_ROOT
The access path of the current package (including the version branch)
package
The name of the current package
version
The version tag of the current package
package_offset
The directory offset of the current package
package_cmtpath
The package area where the current package has been found
<package >_project
The project name to which the corresponding package belongs
<package >_cmtpath
The package area where the corresponding package has been found
<package >_offset
The directory offset of the corresponding package
The second set is deduced from the context and from the requirements file of the package. They can be overridden by the user so as to customize the CMT behaviour.
<package >_tag
The specific configuration tag for the package. By default it is set to $(tag) but can be freely overridden
constituents
The ordered set of constituents declared without any group option
_constituents
The ordered set of all constituents declared using a group= option
The third set of generated macros are the global use macros . They correspond to the concatenation of the corresponding package specific customizing options that can be deduced from the ordered set of use statements found in the requirements file (taking into account the complete hierarchy of used packages with the exception of those specified with the
-no_auto_imports option in their use statement) :
use_cflags
C compiler flags
use_pp_cflags
Preprocessor flags for the C language
use_cppflags
C++ compiler flags
use_pp_cppflags
Preprocessor flags for the C++ language
use_fflags
Fortran compiler flags
use_pp_fflags
Preprocessor flags for the Fortran language
use_libraries
List of library names
use_linkopts
Linker options
use_stamps
Dependency stamps
use_requirements
The set of used requirements
use_includes
The set of include search paths options for the preprocessor from the used packages
use_fincludes
The set of include search paths options for the fortran preprocessor from the used packages
includes
The overall set of include search paths for the preprocessor
fincludes
The overall set of include search paths options for the fortran preprocessor
18.?3.?8 - Macros related with the installation area mechanisms
These macros contain the parameterisation of the installation area mechanisms.
This section describes the various makefile generation sequences provided by CMT . Each sequence description shows the precise set of make fragments used during the operation.
Generated makefile
description
used make fragments
constituents.make
the main entry point point for all constituent targets
18.10 - The internal mechanism of cmt cvs operations
Generally, CVS does not handle queries upon the repository (such as knowing all installed modules, all tags of the modules etc..). Various tools such as CVSWeb, LXR etc. provide very powerful answers to this question, but all through a Web browser.
CMT provides a hook that can be installed within a CVS repository, based on a helper script that will be activated upon a particular CVS command, and that is able to perform some level of scan within this repository and return filtered information.
More precisely, this helper script (found in ${CMTROOT}/mgr/cmt_buildcvsinfos2.sh ) is meant to be declared within the loginfo management file (see the CVS manual for more details) as one entry named .cmtcvsinfos , able to launch the helper script. This installation can be operated at once using the following sequence:
sh> cd ${CMTROOT}/mgr
sh> gmake installcvs
This mechanism is thus fully compatible with standard remote access to the repository.
Once the helper script is installed, the mechanism operates as follows (this actually describes the algorithms installed in the CvsImplementation::show_cvs_infos method available in cmt_cvs.cxx and is transparently run when one uses the cmt cvsxxx commands ):
Find a location for working with temporary files. This is generally deduced from the ${TMPDIR} environment variable or in /tmp (or in the current directory if none of these methods apply).
There, install a directory named cmtcvs/<unique-name >/.cmtcvsinfos
Then, from this directory, try to run a fake import command built as follows:
Obviously this command is fake, since no file exist in the temporary directory we have just created. The protocol-level referenced in this command is described in the standard macro $(cmt_cvs_protocol_level) .
This action actually triggers the CVS pluggin installed in the loginfo CVS metafile. A default pluggin is provided by CMT implemented as a shell script, cmt_buildcvsinfos2.sh , which simply receives in its argument the module name onto which we need information. This information is obtained by scanning the files into the repository, and an answer is built with the following syntax: